
Global tactics library
Defensive Zone Breakout
12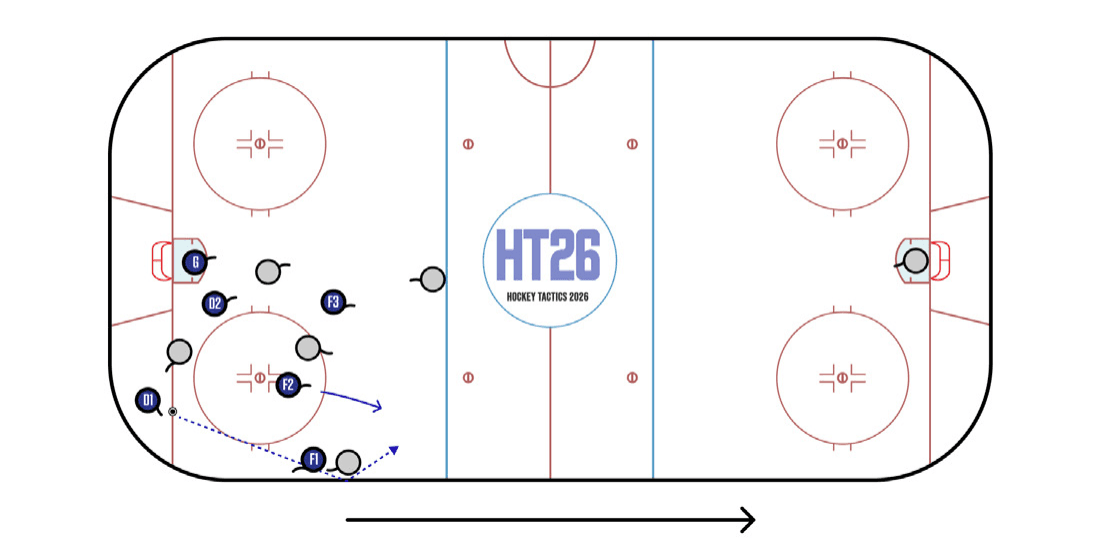
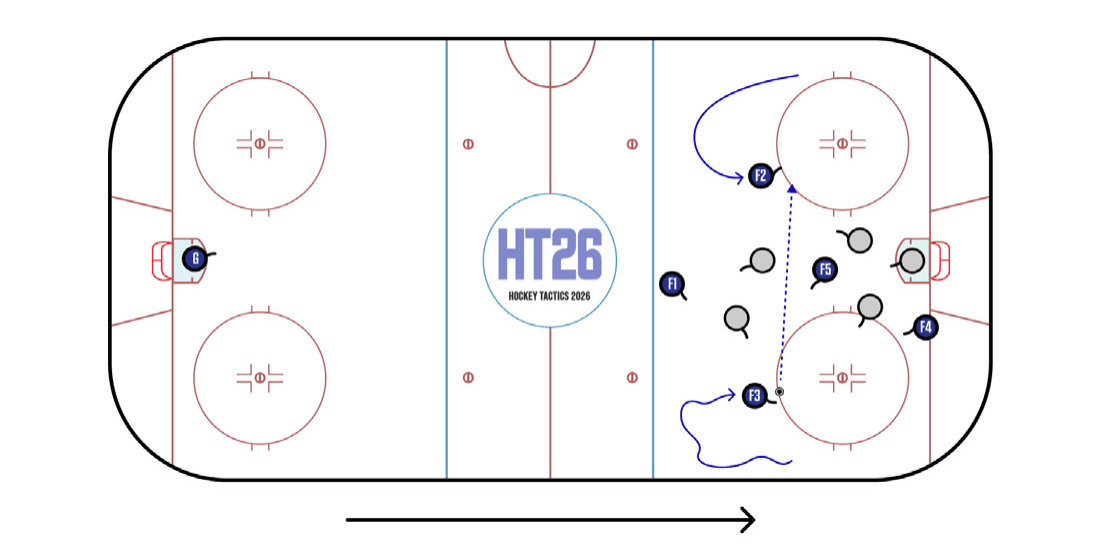
The Bump-By is a useful play against teams that systematically pinch their defensemen. F1 establishes body position, then sacrifices himself by bumping/chipping/redirecting D1’s pass through the pinching D. F2 and F3 anticipate the play and sprint past the pile for a 2v1 opportunity.
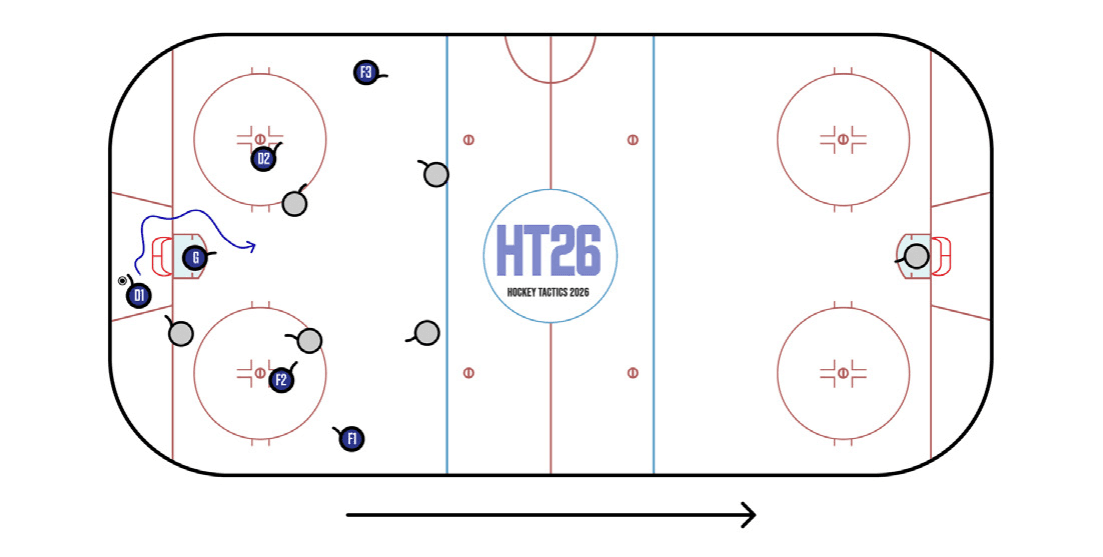
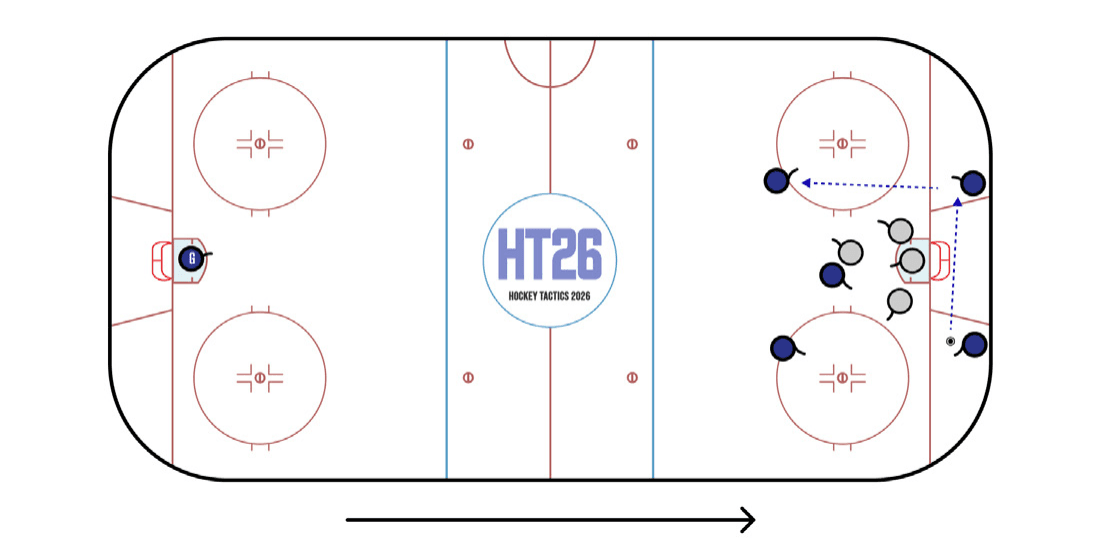
Highly skilled defensemen can create an advantage by drawing in the first forechecker, cutting the back of the net tightly and accelerating into the middle. This creates a fleeting 5v4 advantage than can be leveraged into a chance off the rush.
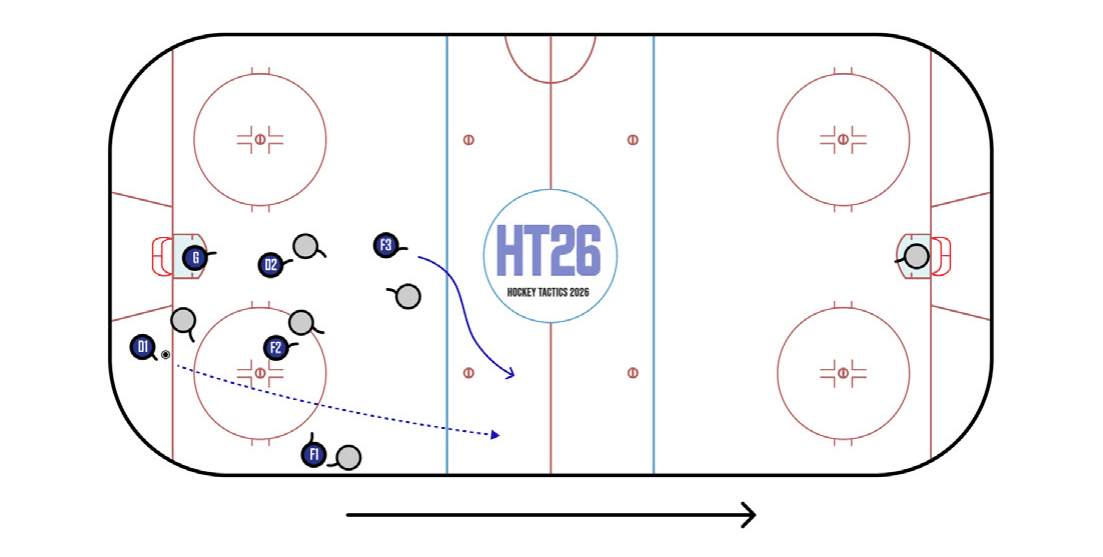
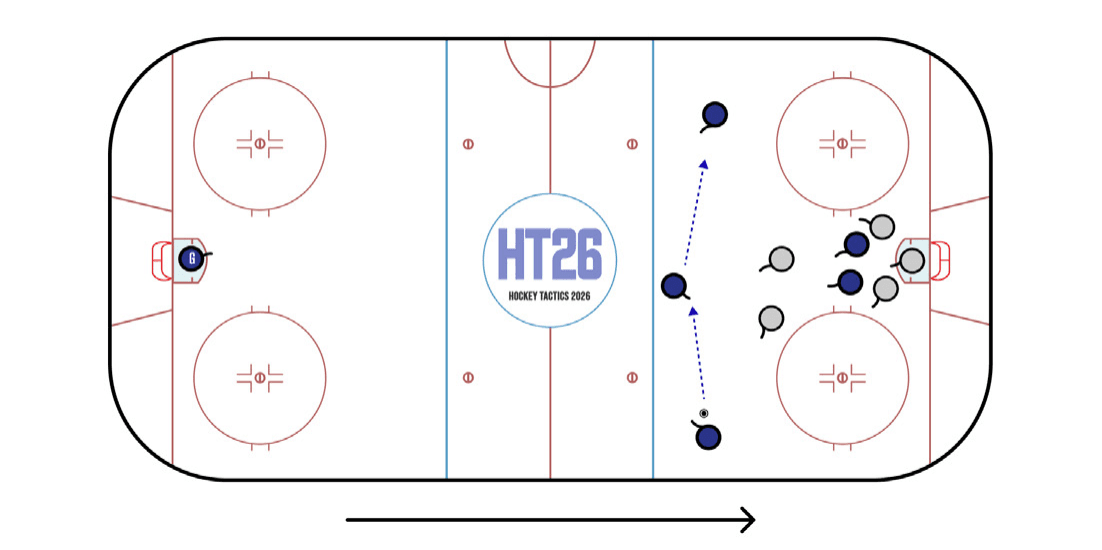
Against a perfectly executed forecheck, the puck carrier may have no choice but to lob the puck out of the defensive zone. Punting the puck is preferable to making a defensive-zone turnover, but it is still a negative outcome unless F3 can get to the loose puck first.
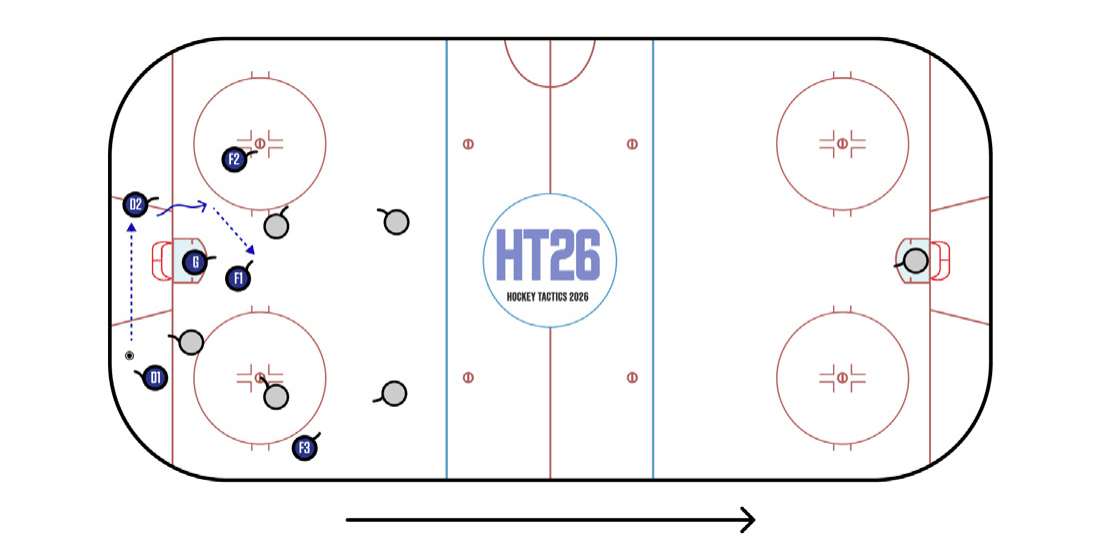
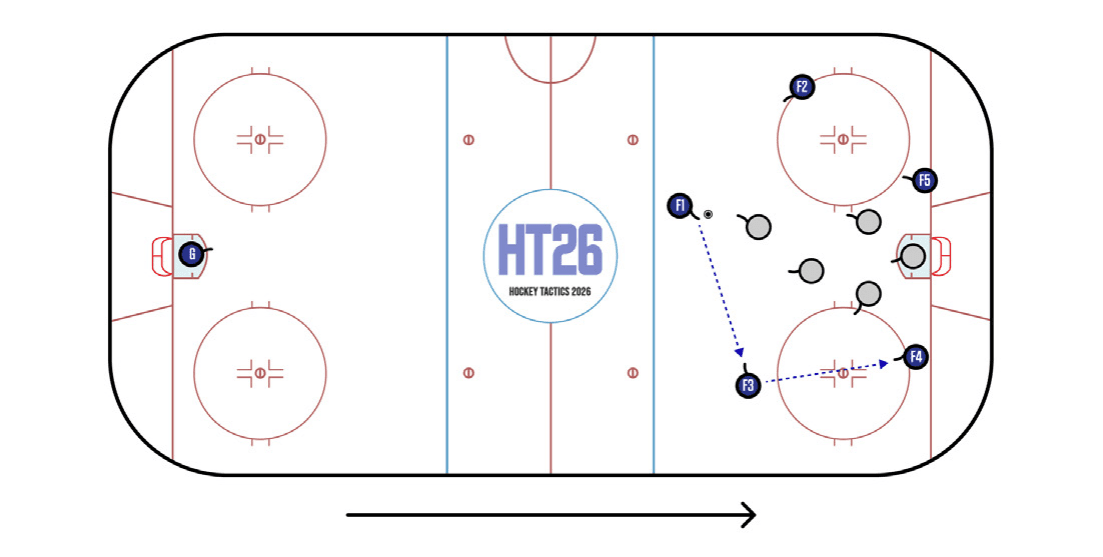
On a D-to-D pass behind the net, the center (or the first forward back into the zone) swings low to open a passing option in the middle. D2 and F1 work together to play off the nearest forechecker’s heels. F1 must scan the ice before and after reception, while being careful not to mishandle the puck and give up a high-danger chance against.
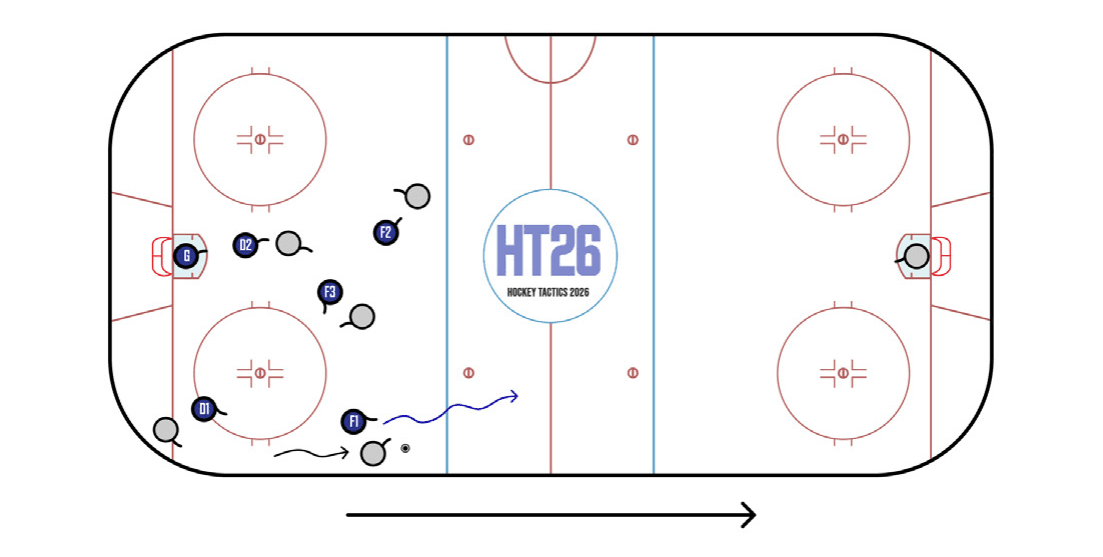
Counter-attacks out of man-on-man coverage are usually initiated by a 1v1 battle won near the blue line. F1 attaches to puck carrier, forces him up the wall and steals the puck for a breakaway opportunity. Note that F2 and F3 are less likely to join the rush in this scenario, as they’ve already turned their feet toward their net in order to stay with their checks.
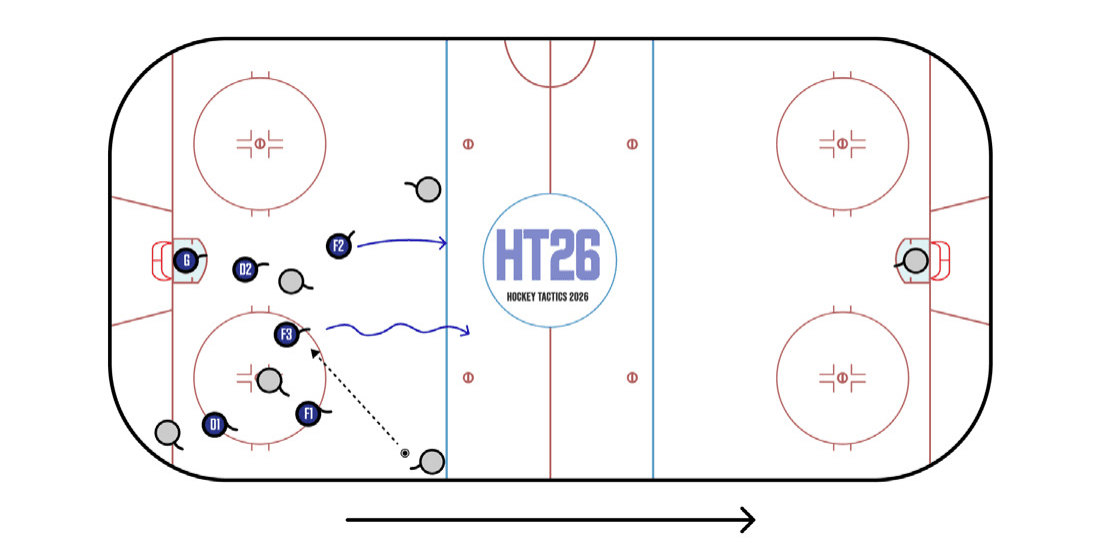
Counter-attacks out of zonal coverage are usually initiated by a shot block or an interception. F3 gets in the way or moves pre-emptively to pick off a centering attempt. F2 accelerates past the flat-footed weak-side defenseman.
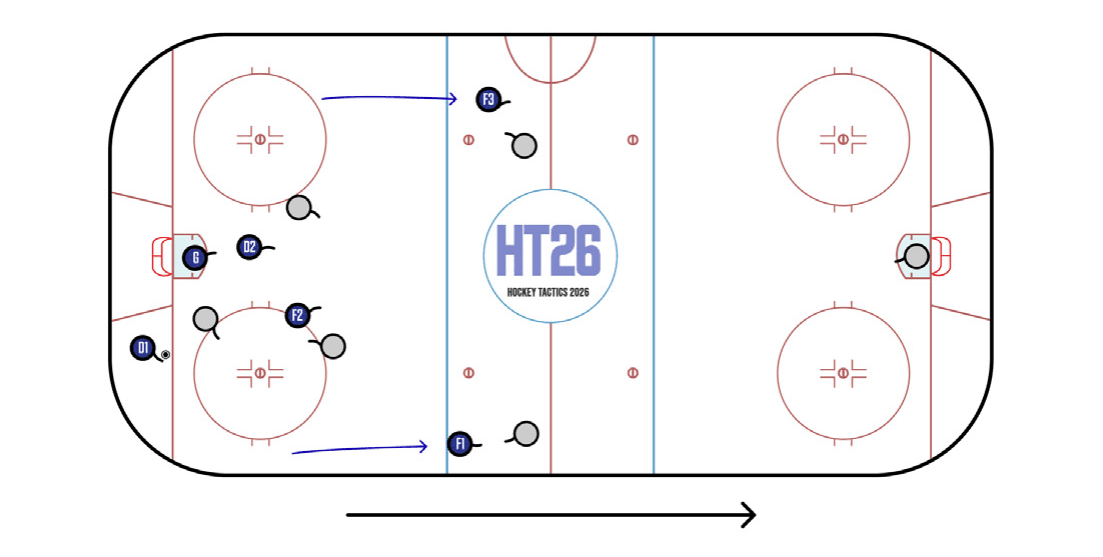
As the blue team regains possession, two forwards fly the zone to create a 3v3 underneath. Push on Possession creates offensive opportunities for both teams, as a failed exit can quickly degenerate into an odd-man situation near the net.
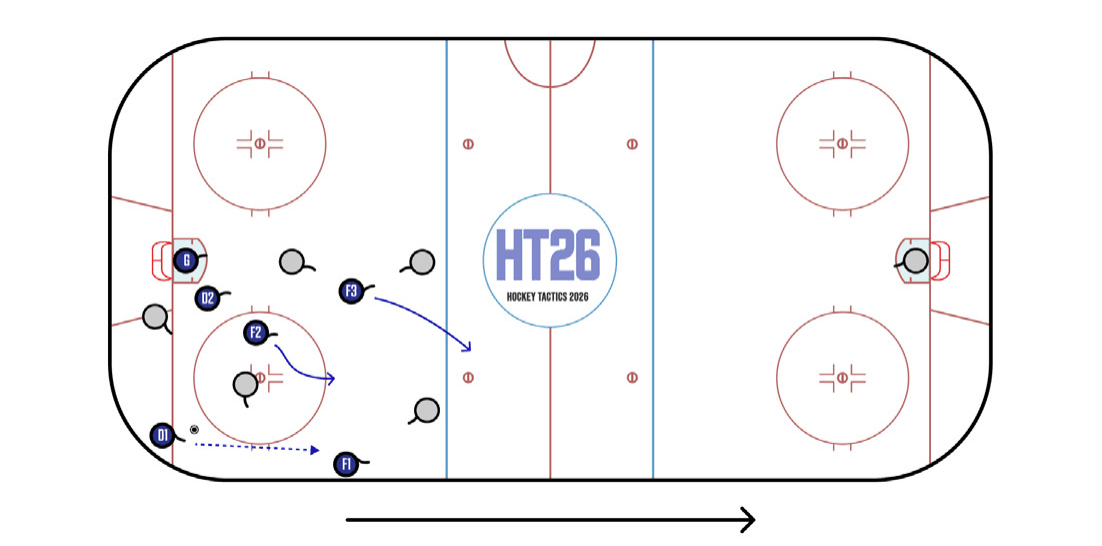
D1 plays the puck up to F1 on the strong side. F2 supports the play along the dot lane. F3 sprints middle or between opposing Ds. D2 stays back in case of a turnover. Forcing the play up the strong side is an effective tactic for teams with heavy, fast wingers, but this scheme’s predictability handcuffs players who are most effective when exploiting the width of the ice.
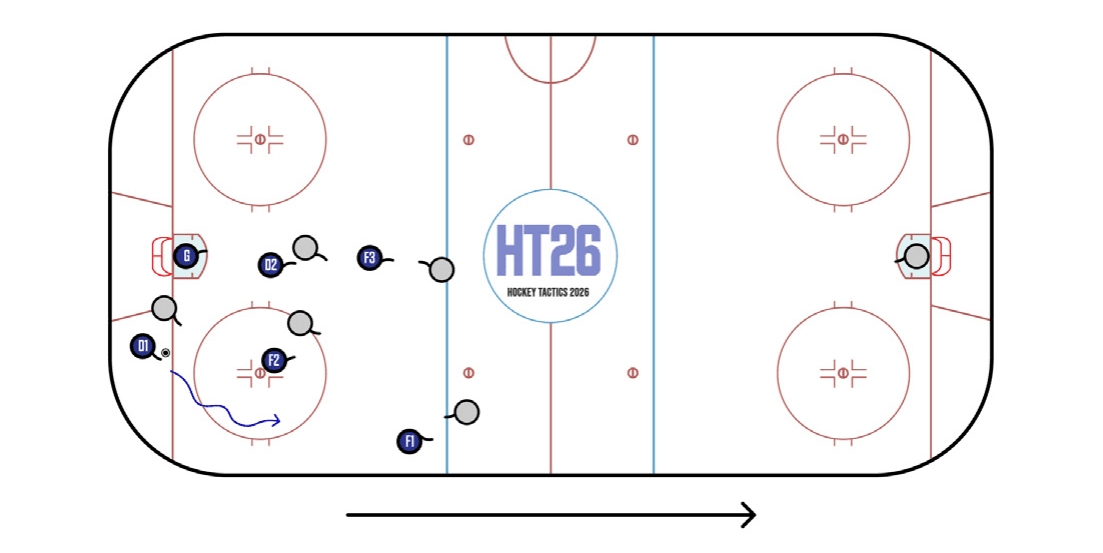
Similar to Close Support, except F1 leaves the zone early in order to prevent the opposing defenseman from pinching. This creates more space for D1 to carry the puck out of the zone.
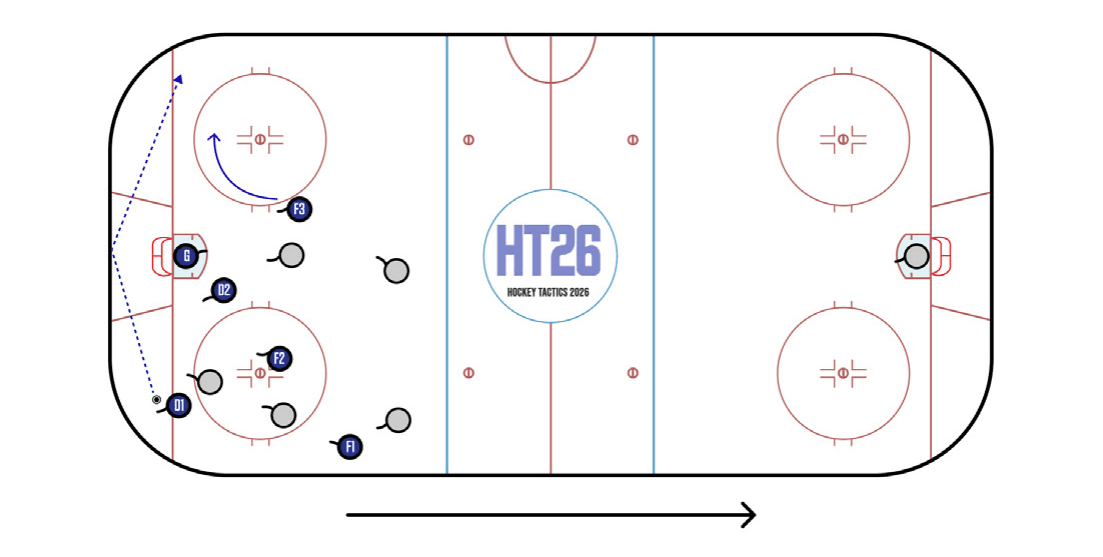
The Weak-Side Rim is an effective play against heavy forecheck pressure, since it bypasses multiple players with a single indirect pass. Effective defensemen use it judiciously, when the opposing forecheck has committed three skaters deep and when F3 is in position to skate onto the pass. Others default to it as a way to avoid having to make a more challenging, situationally appropriate, play.
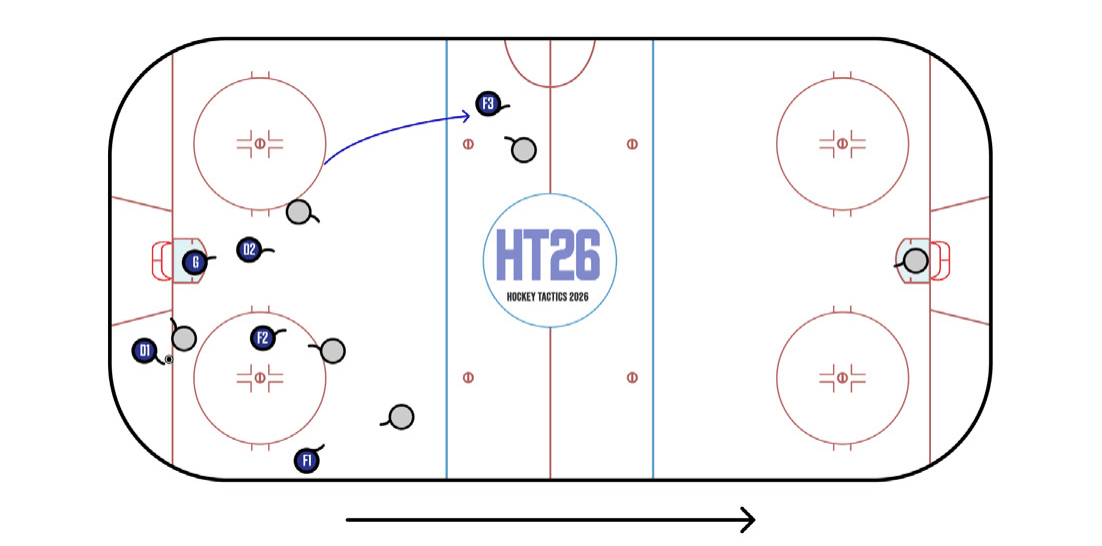
As the blue team regains possession, F3 pushes an opposing D behind the blue line to create a 4v4 in the defensive zone. This provides more space for the remaining players to generate an exit. Alternatively, F3 may drive between opposing Ds to force both into the neutral zone, which produces a valuable 4v3 underneath.
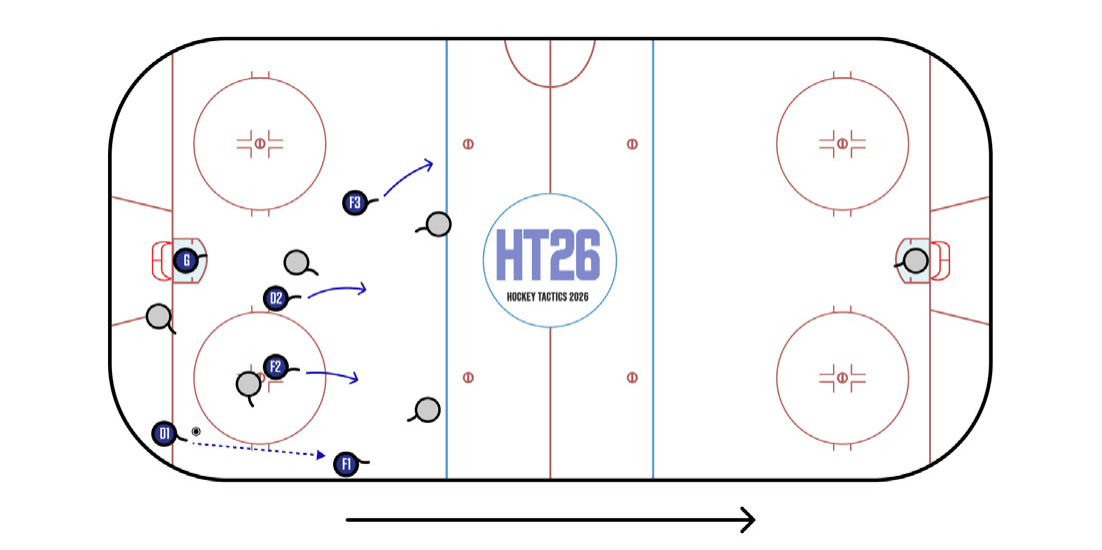
Weak-Side Winger Wide is a popular alternative to the Strong-Side breakout. F3, the weak-side player, attacks the open space to draw a defenseman away from the middle. D2, the netfront defenseman, sprints to fill the vacated lane. A quick up to F1 yields multiple change-of-side options in transition.
Low Defensive Zone Coverage
4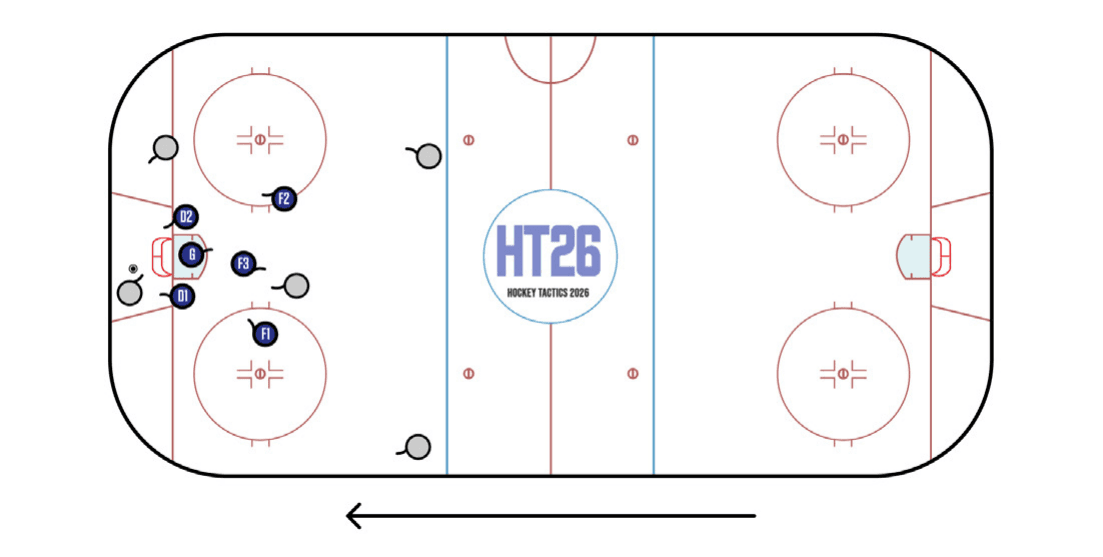
All five defenders collapse to the slot against behind the net plays. If only one defenseman chases underneath the goal line, a skilled puck carrier can fake one way, cut back the other and walk out front for a wraparound opportunity. If both Ds chase behind, the obvious play is a rim release toward either point. If neither chase, an especially cheeky player can pick the puck up and try for a lacrosse (a.k.a. Michigan) goal.
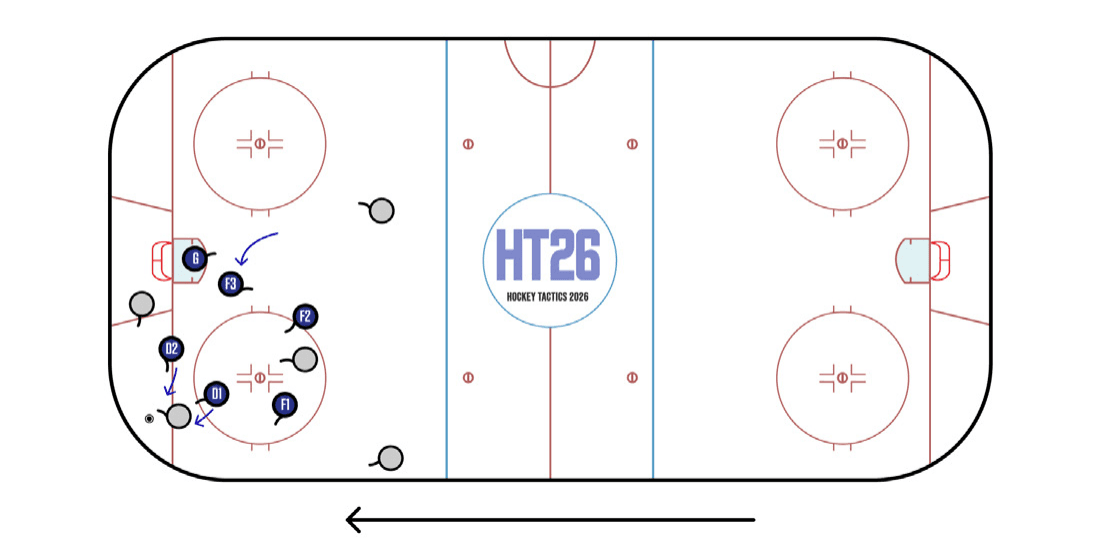
The Swarm is variation on the typical overload DZ coverage. D1 and D2, usually the first two players back in the zone, converge on the puck carrier. The front of the net is momentarily left open, until F3 arrives. In theory the Ds’ swarming action allows for a quicker defensive stop. The Swarm must be employed judiciously because 1) it can be defeated by a quick rim toward the strong-side point or the weak-side half wall and 2) defenders are overly compact and are therefore unable to break out effectively after winning the puck.
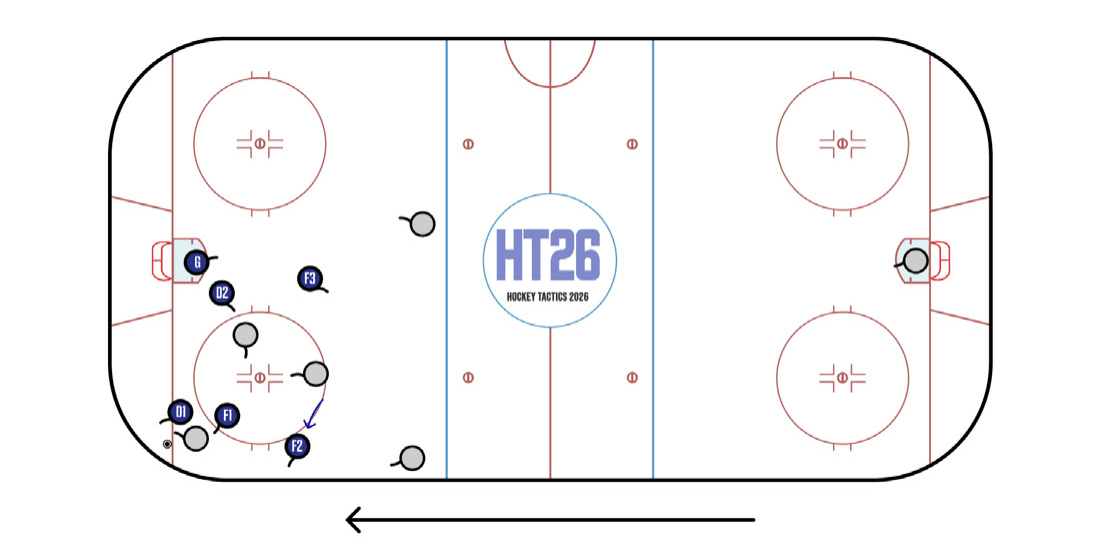
Five Tight creates a 5v3 overload in one corner. D1 and F1 work together to stop the opposing puck carrier and push him into the boards. F2 pre-emptively denies the simple low-to-high pass by cutting the top . F3 protects the slot. D2 protects the front of the net.
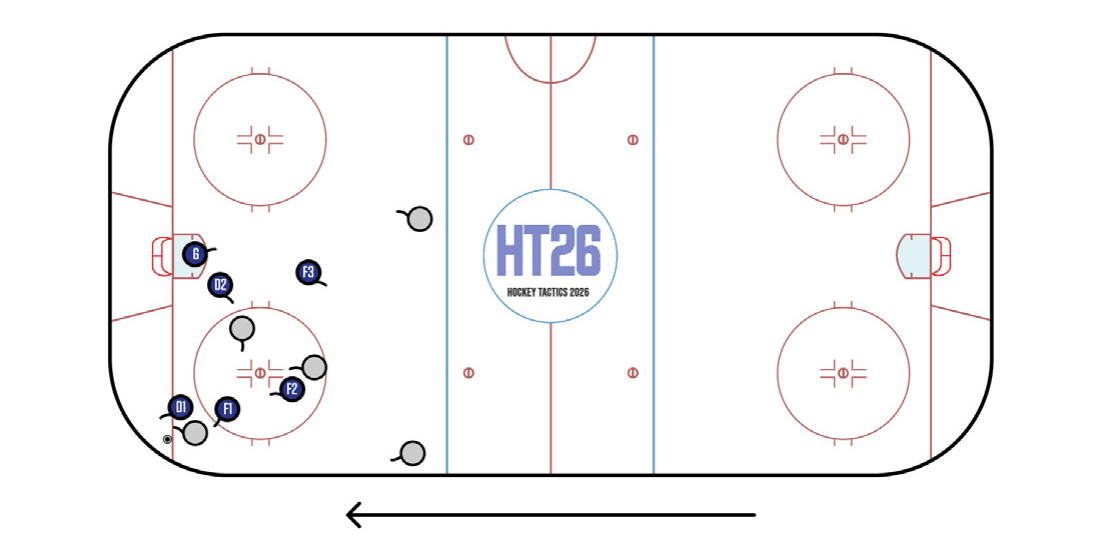
As an alternative to cutting the top, F2 can stay in the middle to mark the opposing high forward. The defensive team improves its slot coverage but relinquishes its ability to contest low-to-high play. This passive variant of the Five Tight can be effective for physical teams that look to counter-attack following slot turnovers and blocked point shots.
High Defensive Zone Coverage
4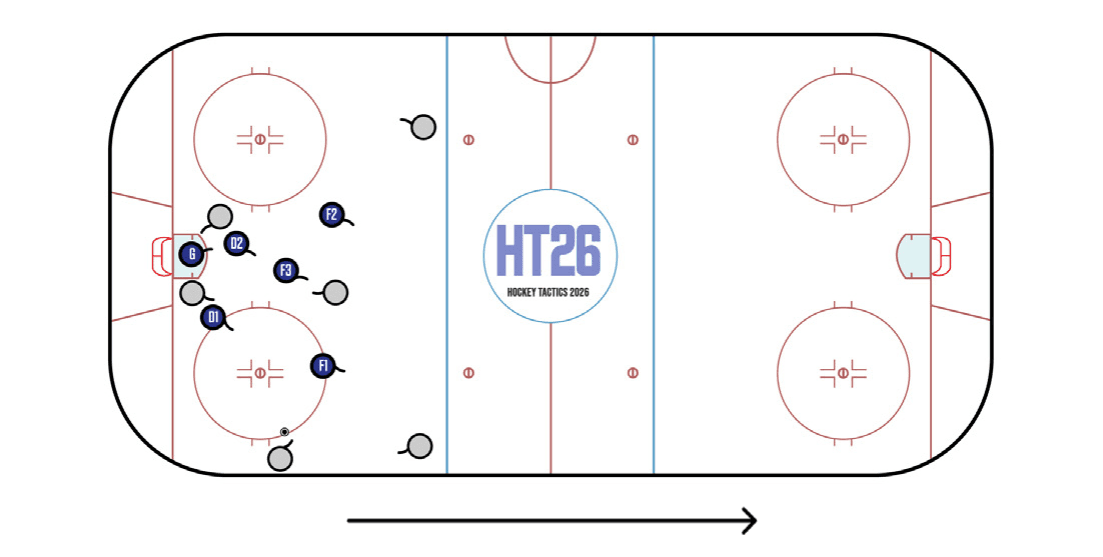
Short-handed situations (5v6, 4v5, etc.) call for zone defense. Instead of boxing out, Ds front the two opposing forwards near the net. This allows them to get in the way of point shots and help F3 protect the slot. In the example above, fronting turns a 5v6 into essentially a 5v4, which is great as long as the puck doesn’t get to the attackers at the top of the crease.
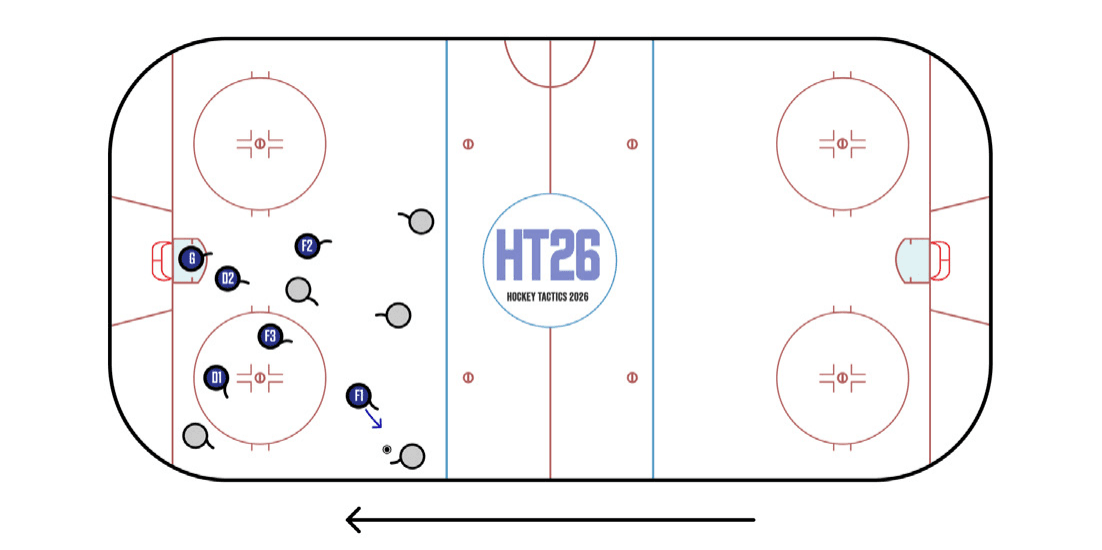
A zone defense denies shooting and passing lanes rather than individual players. As the puck is passed back to the point, F1 sprints toward the recipient while making sure he is in the shooting lane. F2 starts in the high slot but is ready to pressure a D-to-D pass. This stagger provides additional safety in the event that the puck carrier fakes out F1 and skates into the high slot.
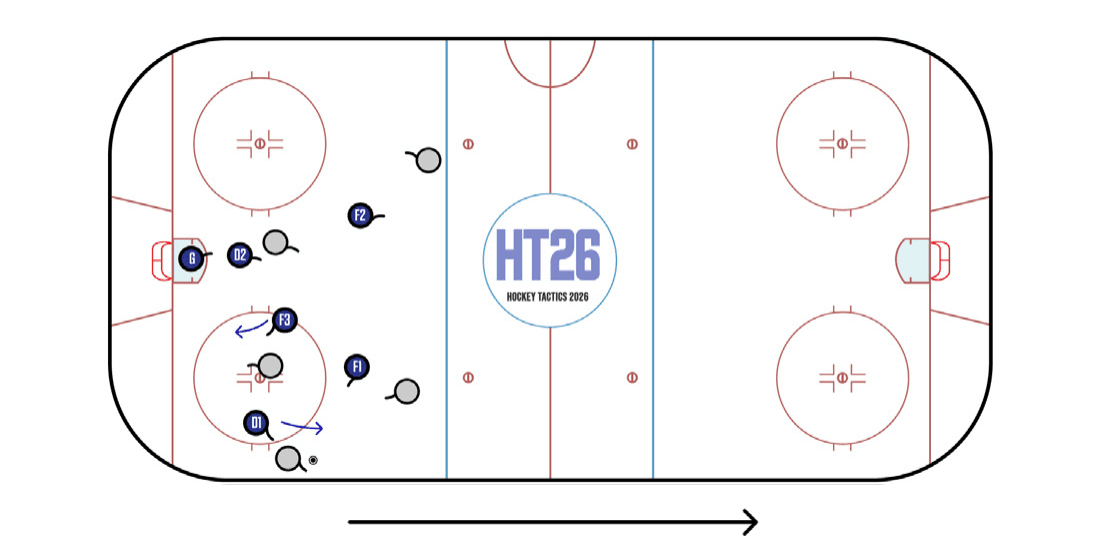
A popular compromise between zone and man coverage is the Hybrid. The defending team plays Five Tight down low, but quickly flex out into man-on-man coverage once the puck is passed to the blue line. On a low to high carry, D1 follows his man to prevent F1 from being out-numbered at the point. At the same time, F3 stays D side to prevent a 2v1 at the net.
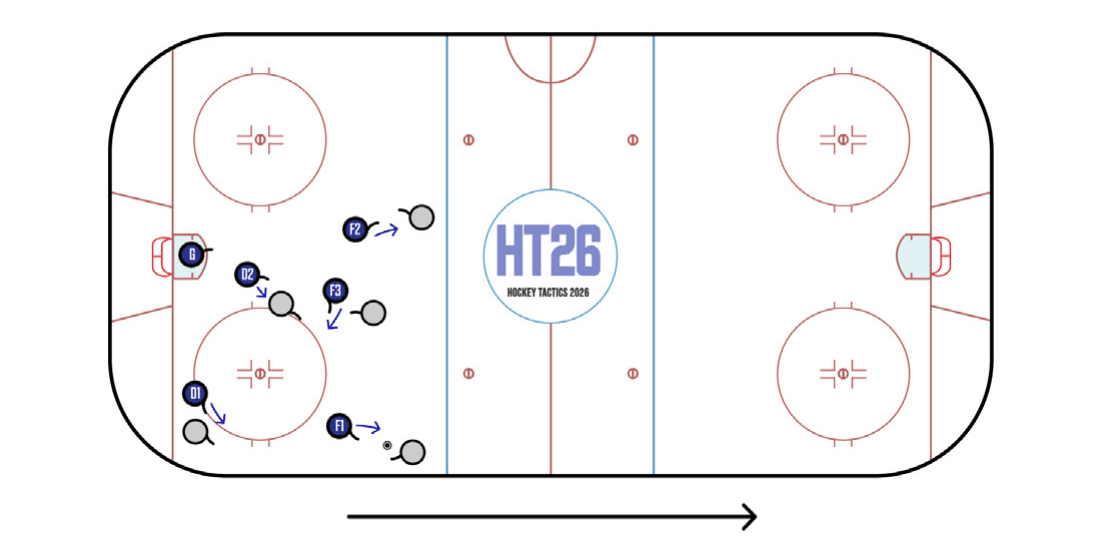
As the name indicates, man-on-man coverage focuses on individuals rather than lanes. All five defenders attach to their checks and do their best to stay D side (between the opponent and the net). A strict man-on-man DZC provides better high (from faceoff dots to the blue line) coverage at the expense of inferior low (dots to end boards) coverage. If the attacking team moves the puck toward the corner, it’ll be playing 3v3 down low rather than 3v5
Neutral Zone Forecheck
10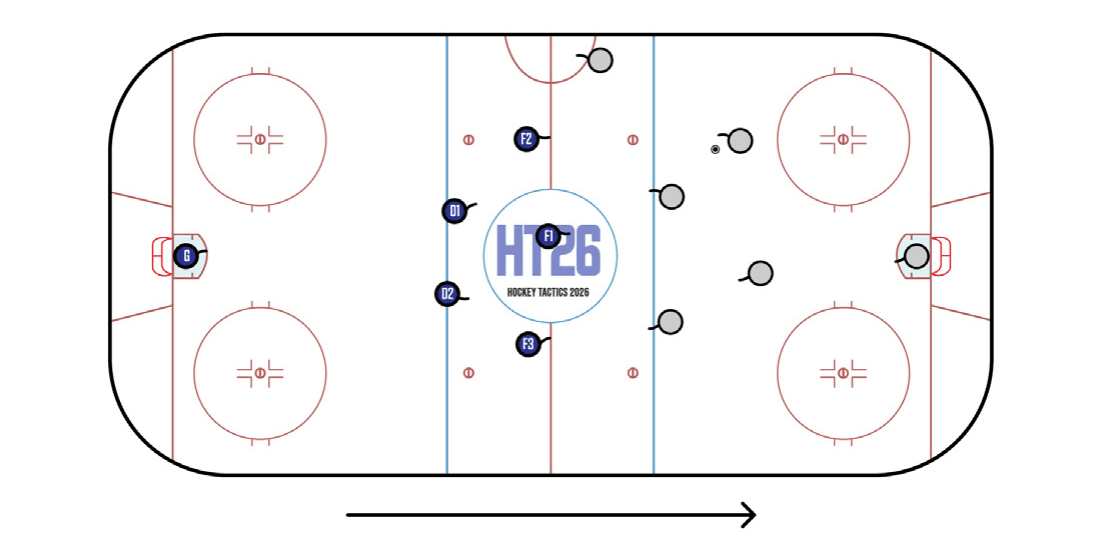
The most passive neutral-zone scheme is the 0-5, with all five skaters standing in the back half of the NZ. No defensive player makes any attempt to pressure the puck carrier before the red line. This type of NZ trap is often seen in Europe and is seldom effective in the NHL.
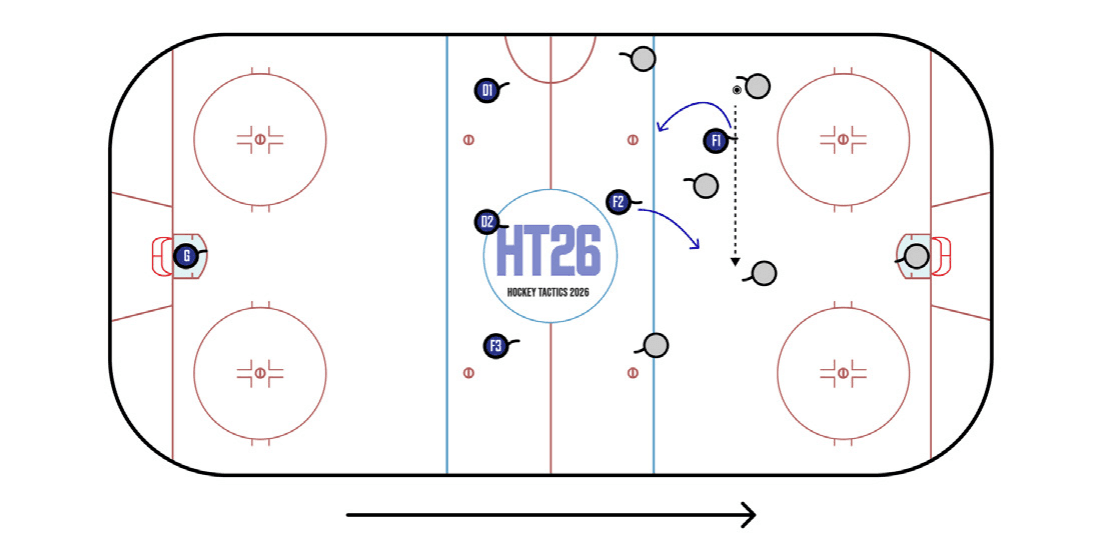
In a 1-1-3, F1 and F2 work together to disrupt the opposing regroup while D1, D2 and F3 build a wall. This somewhat passive NZ FC enjoyed a surge in popularity at the NHL level between 2019 and 2022, but the majority of teams have reverted to the 1-2-2, which does a better job of protecting the red line.
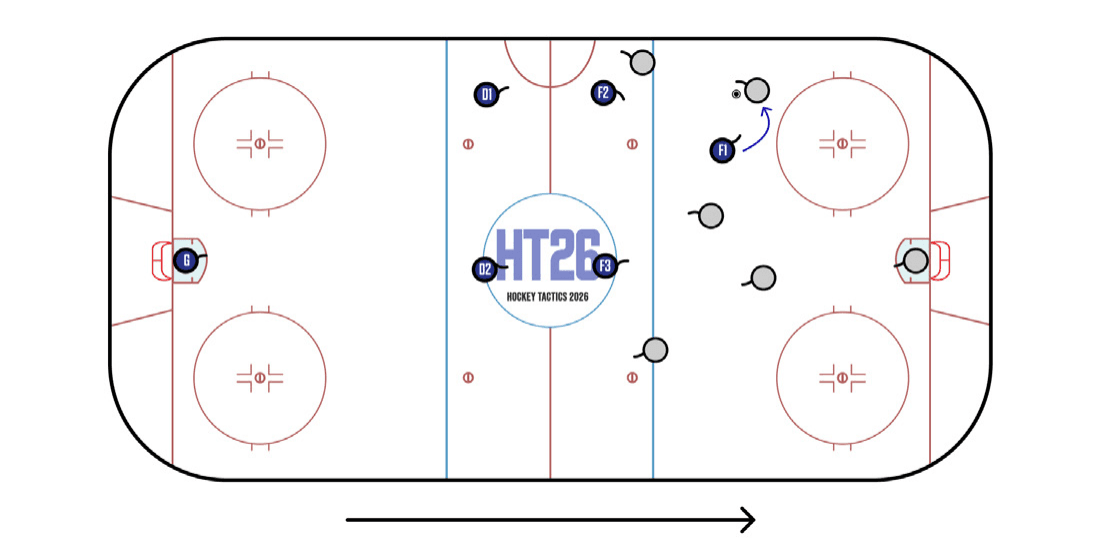
The familiar 1-2-2 remains the neutral-zone forecheck of choice from house league to the NHL. F1 influences the play toward the wall by angling the puck carrier. If successful, the play becomes a 4v3, with F2 and D1 denying the strong side and F3 staying above the middle threat.
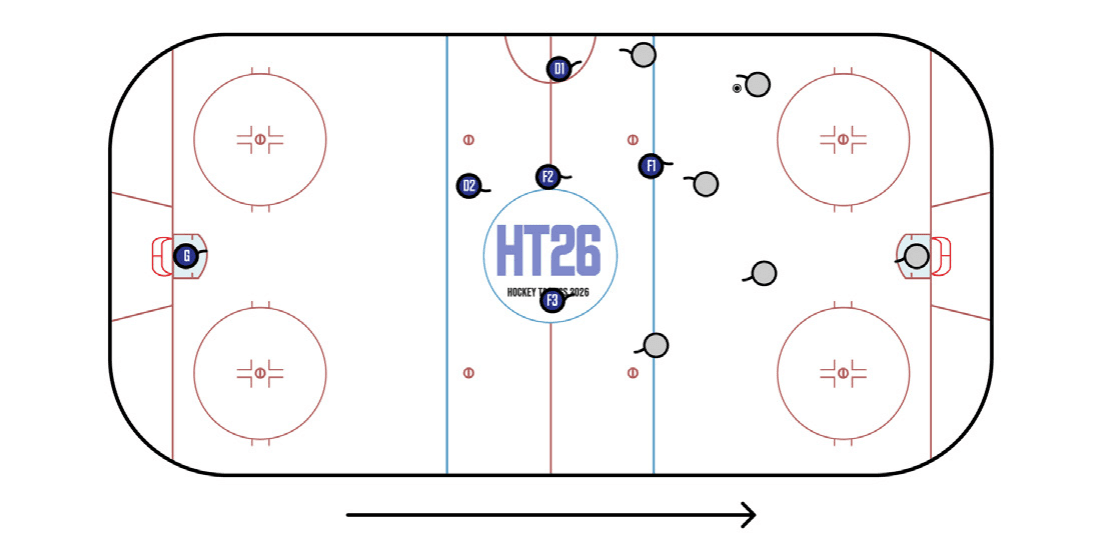
The 1-3-1 trap is the antithesis of the 2-1-2. The five defensive skaters stand in their spots in pure zone coverage, daring the opposition to make a risky carry across the neutral zone. If the puck is dumped in, D2, the last man back, has a head start on the retrieval.
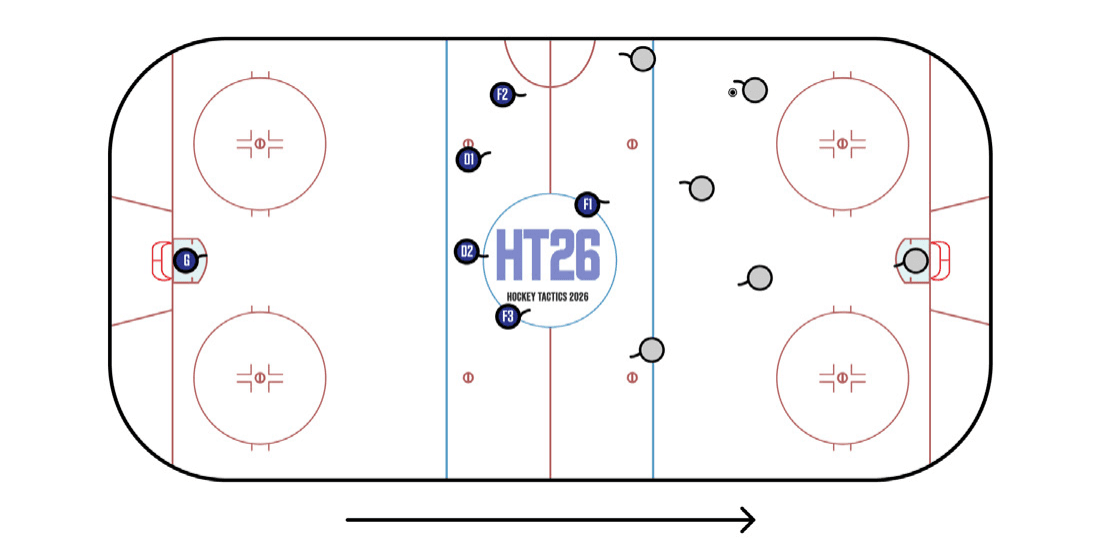
The 1-4 trap, by virtue of its similarities to the ubiquitous 1-2-2, is easier to teach and easier to deploy. However, it is vulnerable against strong forechecking teams that only need access to the red line to wreak havoc, as well as skilled players who can dangle through multiple flat-footed opponents at the offensive blue line.
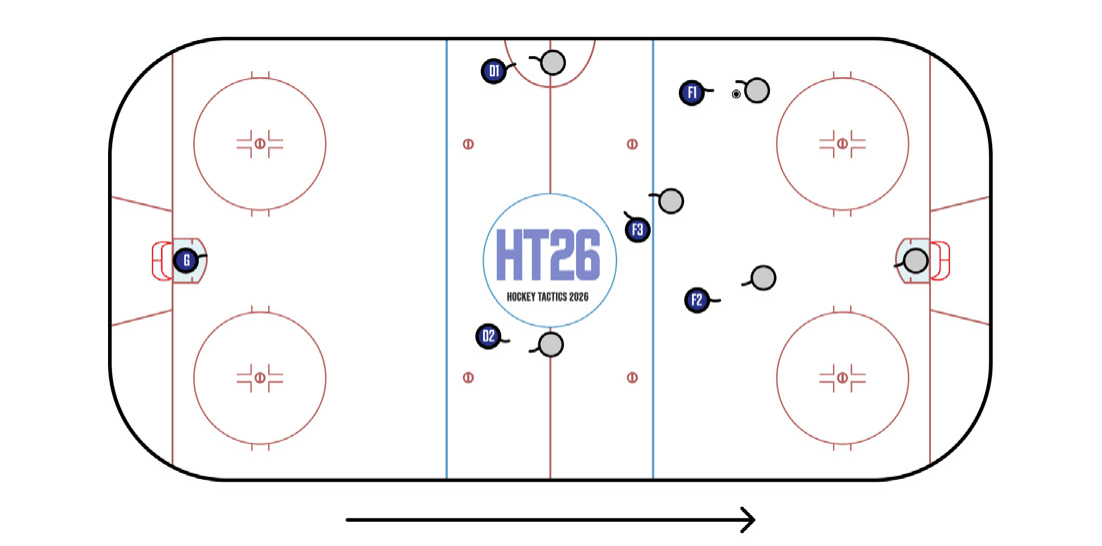
The 2-1-2 is essentially man-on-man coverage, with wingers (F1 and F2) pressuring opposing defensemen, the center (F3) staying above his counterpart and Ds gapping up early against opposing wingers. Man coverage breaks down unless everyone is fast and fit enough to hit their marks, so the 2-1-2 is most often seen following NZ faceoff losses, rather than in open play.
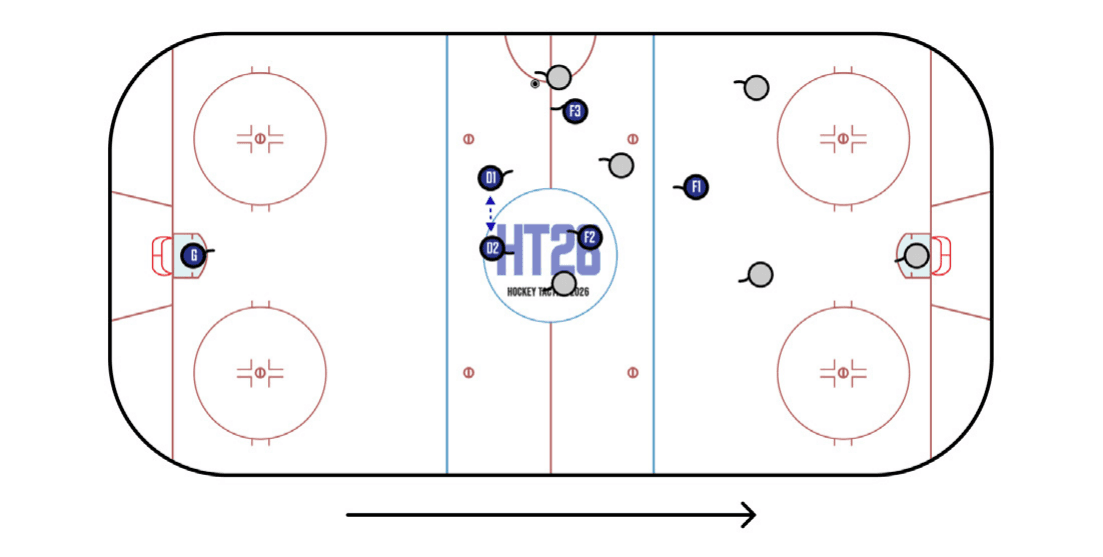
Defensemen in a 1-2-2 NZ FC typically look to play a tight gap and cut off wide carries near the red line. If this is not possible, D1 and D2 tighten up to create the illusion that they will not contest a wide controlled entry. Once the puck carrier commits to straight-lining outside the dot lane, D1 and D2 can either protect the middle and wait for F3 to catch up to the puck carrier, or surf out aggressively to force a dump-in.

Another option for F3 is to stay between D1 and D2 to form a 1-1-3. On occasion this read can help the defending team deny the entry and seamlessly transition to offense, but having the tracker split the Ds can create confusion and lead to breakdowns on the way back to the DZ.
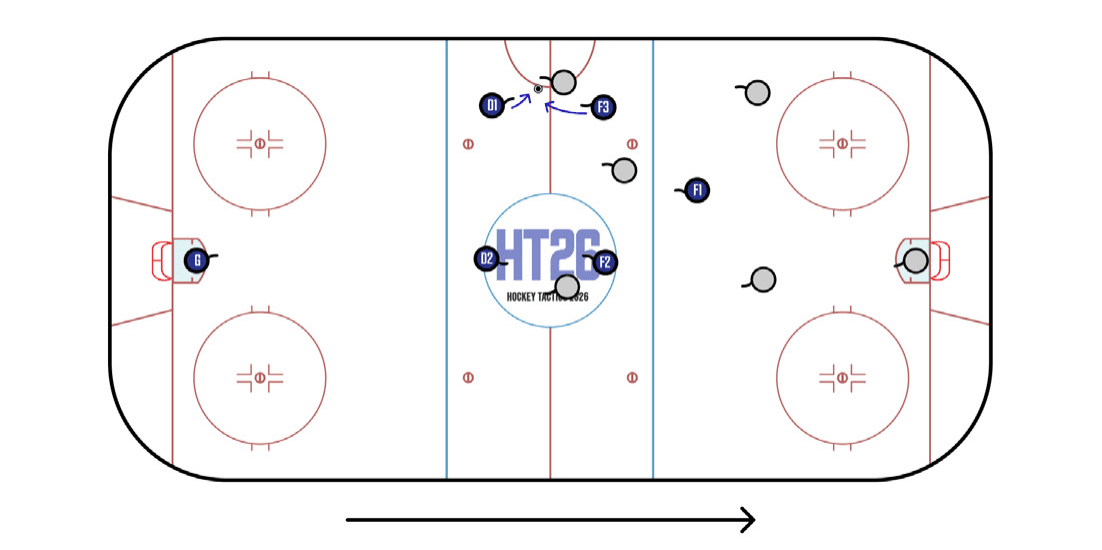
The term backchecking invokes effort and intensity, while tracking details the reads and routes players take against counter-attacks originating from the offensive zone. Tracking occurs almost exclusively in the context of a 1-2-2 or 1-1-3, as the defensive team won’t have the time to morph into another shape. In the example above, F3, the first forward back, hounds the puck carrier until the red line, allowing D1 to gap up and possibly step up to deny the entry.
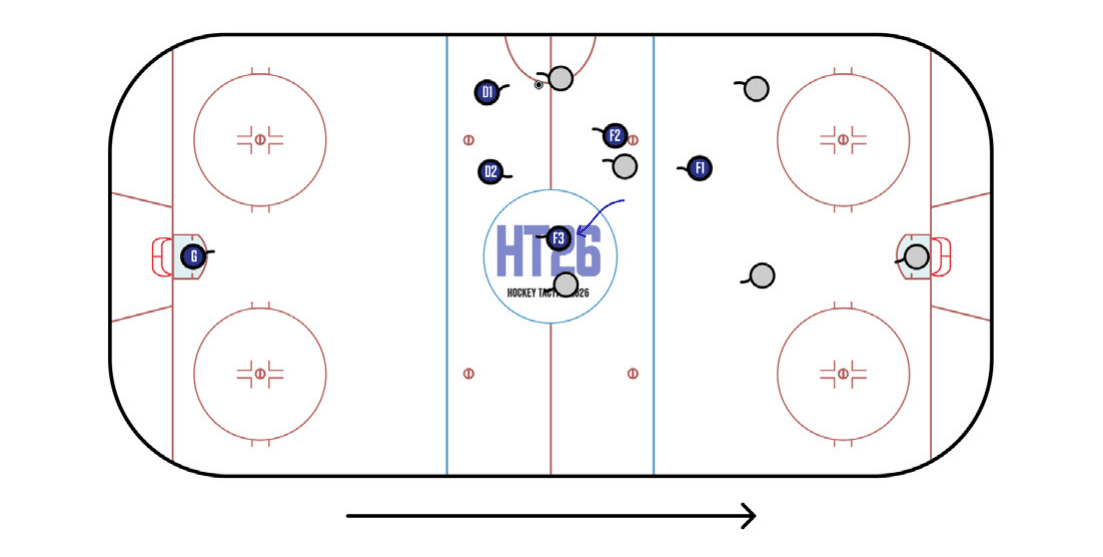
If F3 is unable to create back pressure at the red line, he can switch off from the puck carrier and re-route to get above the wide threat. This allows D1 and D2 to stay tight to each other, surf as a unit and close off strong-side entry attempts.
Neutral Zone Regroup
6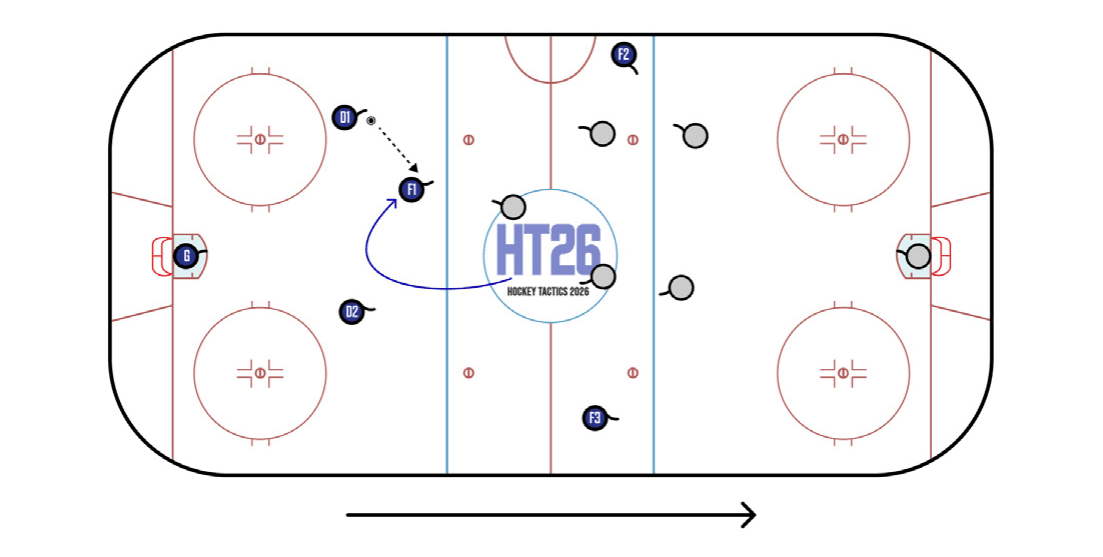
Instead of making a Right Up, D1 can delay and find F1 circling back for a pass reception in the middle. The Center Low play is less likely to catch opposing players off-guard, but gives high-end puck carriers an opportunity to leverage their strength against a flat-footed defense.
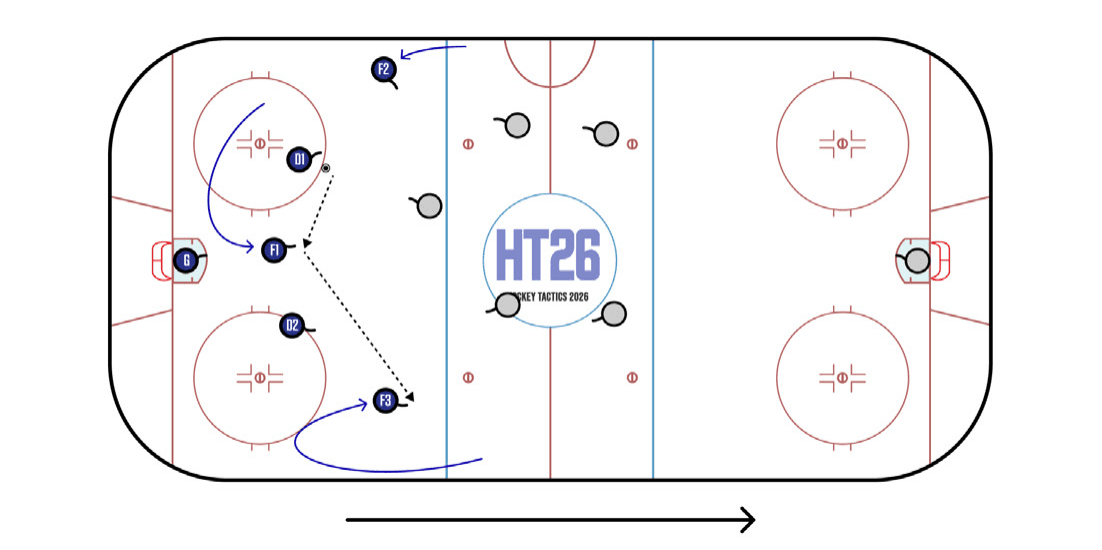
Widely adopted by European pro leagues, the Five Back regroup calls for Fs to swing back toward the defensive zone to support the Ds. All five skaters then build speed and attack the neutral zone using short lateral passes to pick the defensive structure apart. This regroup is unpopular in the NHL, as teams prefer to station Fs at the far blue line to create quick-strike opportunities.
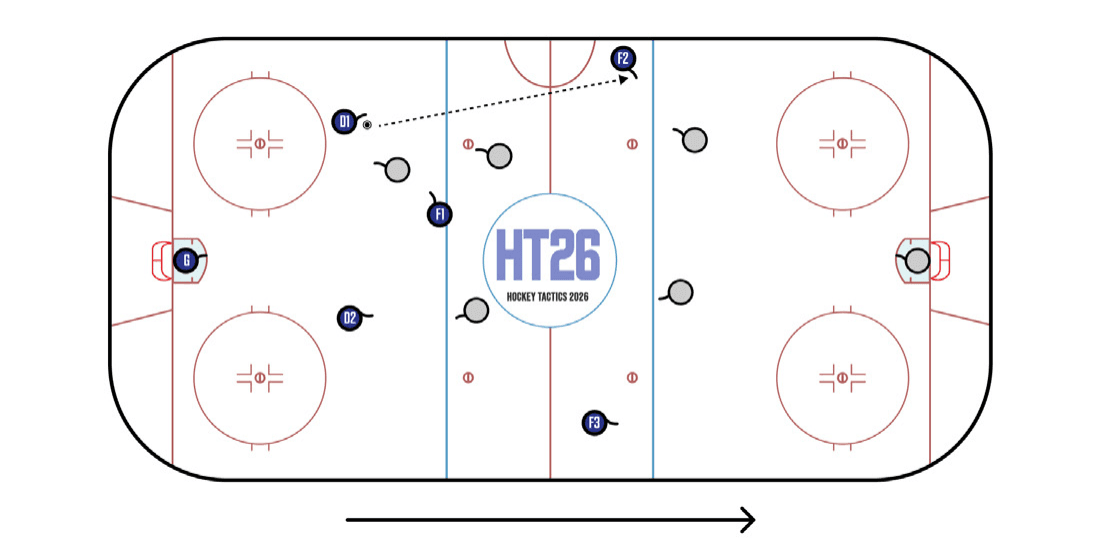
A typical regroup starts in a 2-1-2 formation with the Ds back, a low forward (usually the center) in support and both wingers stretching toward the offensive blue line. Against a 1-2-2 NZ forecheck, a timely Right Up play bypasses opposing forwards and creates a wide 1v1 between F2 and an opposing defenseman. The Right Up is a simple play, but one that can easily result in an icing or a turnover if the vertical pass fails to connect.
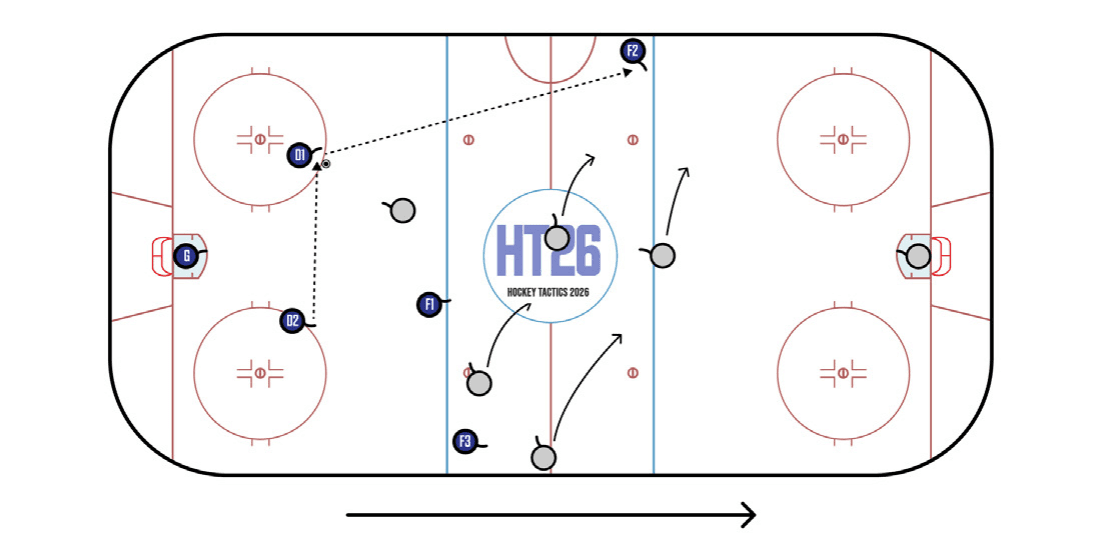
The second period long change creates an opportunity to catch opponents off-guard on a regroup. As the defending team makes a line change, the attacking team moves the puck to the opposite side and uses a Right Up to create an uncontested wide entry. As defenders sprint across to challenge F2, F1 and F3 sneak by to create an odd-man situation at the net.
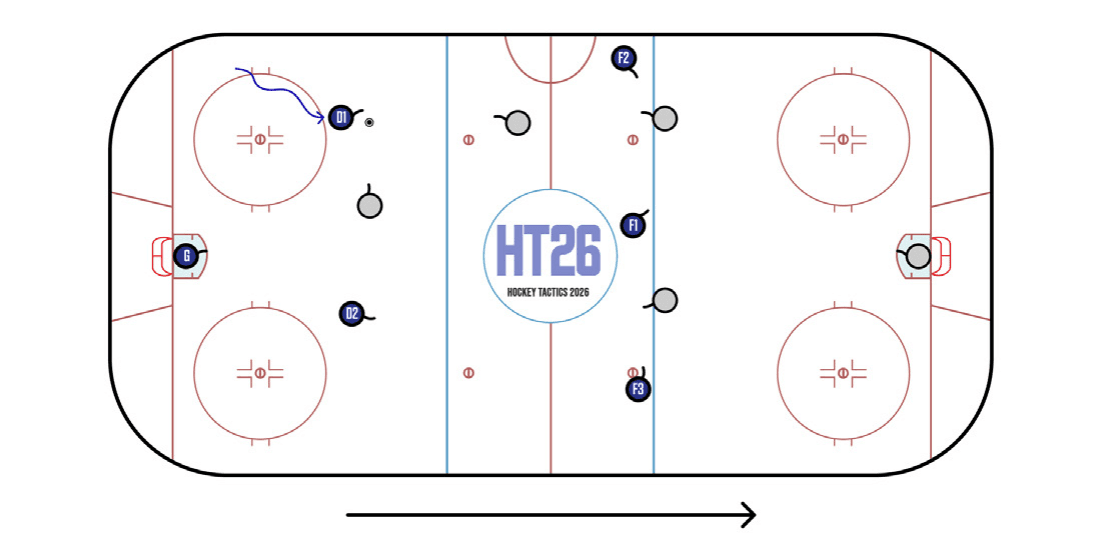
Popular among high-level teams, the Three High is a double-edged sword. By sending all of its forwards to the far blue line, the offensive team pushes opposing Ds back and can create an immediate 3v2 rush with an accurate stretch pass. When poorly executed, the Three High leads to unrecoverable dump-ins and dangerous counter-attacks, as Ds and Fs struggle to close the wide gap between them.
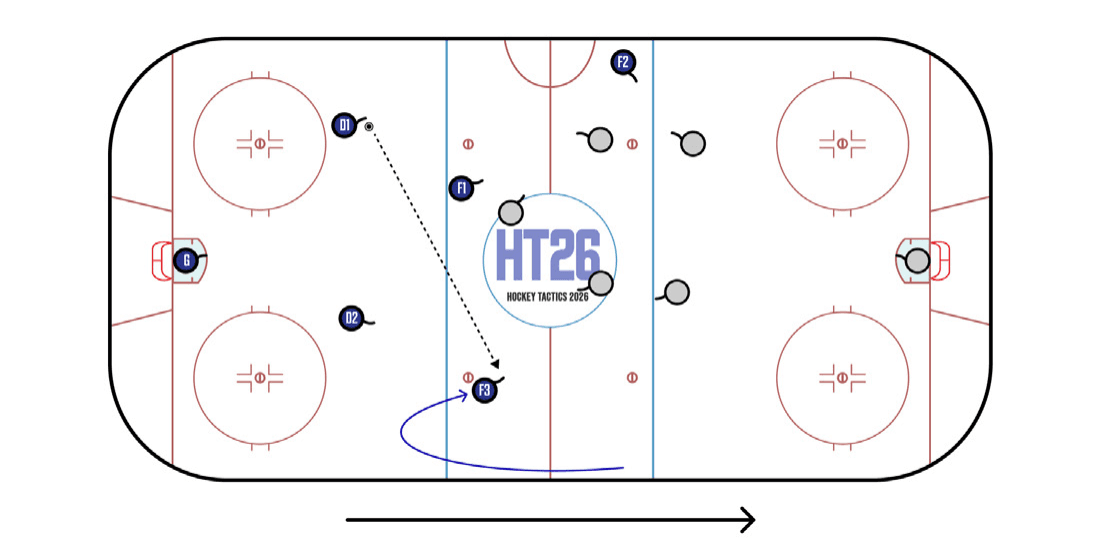
The Weak-Side Winger Low is an effective play for forwards with tremendous outside speed. The F1/center acts as a decoy in the middle while D1 sends a cross-ice to F3, who’s curled back to create a flatter passing angle. This change-of-side is especially difficult to defend for NZ forechecks that overprotect the middle, as shown above.
Offensive Zone Forecheck
10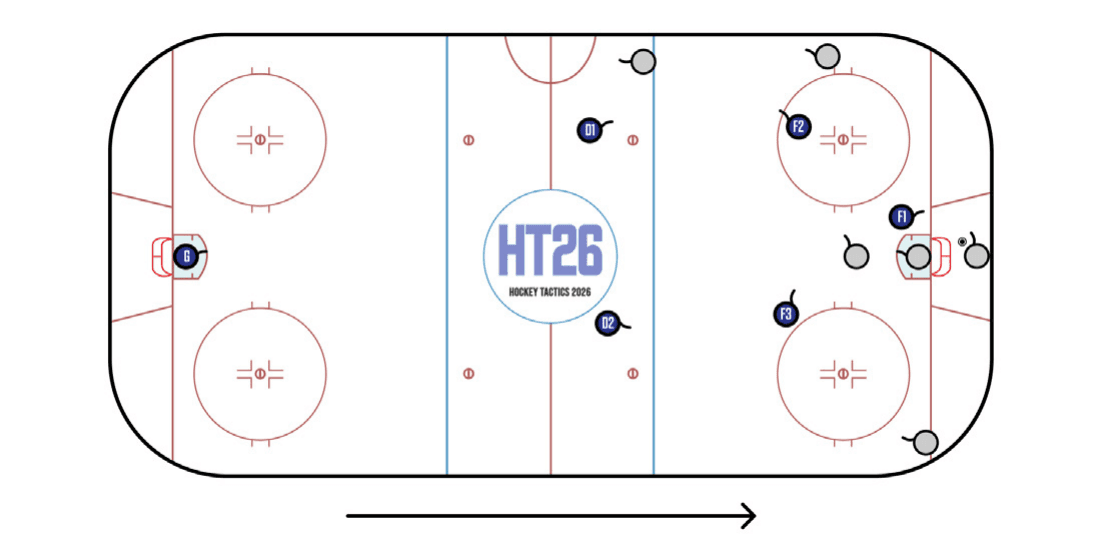
A Set Forecheck is used against a Set Breakout, where the opposing puck carrier stops behind the net and their teammates run predetermined routes up-ice. The defending team has two major decisions to make: 1) Does F1 chase behind the net? 2) Do the other four players attach to individuals in man-on-man coverage or fall back as a unit in zone coverage?
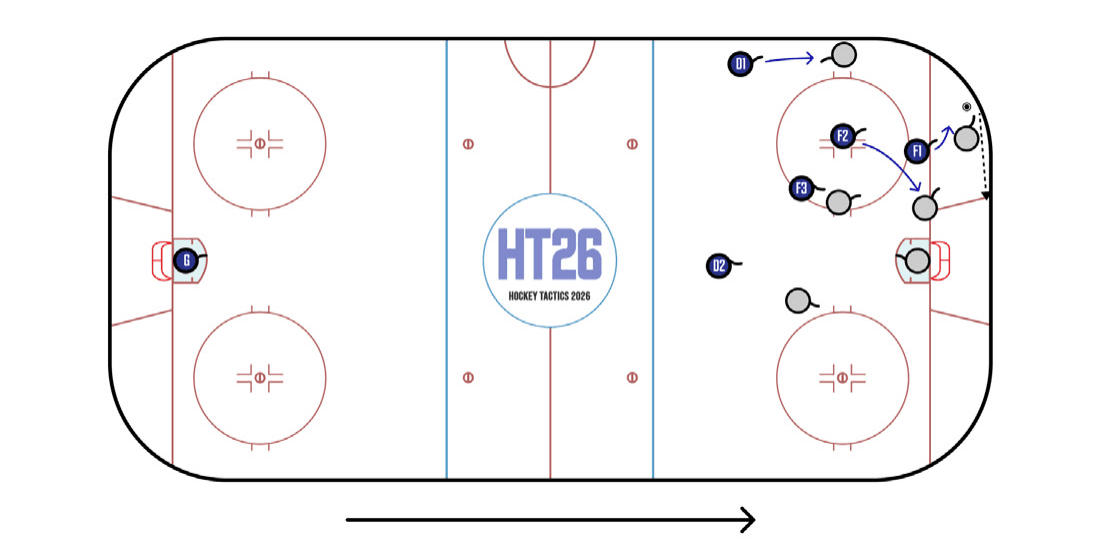
As attackers become more skilled and tactically fluent, forecheckers adjust by dialing up their aggression. The now-popular Skinny variant of the 1-2-2 calls for forwards to attack the puck carrier in a narrow column. If F1 is beaten by a D reverse, F2 jumps on the pass recipient. F3 stays above and acts as backup. Ds are responsible for wide exit attempts, and pinch against rim plays.
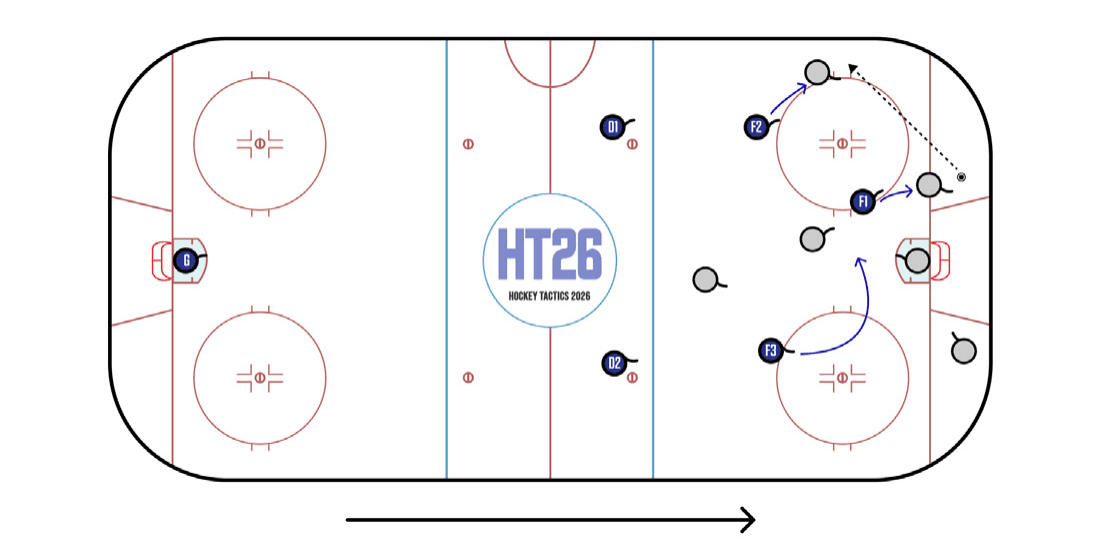
The 1-2-2 is the first forechecking formation minor hockey players learn as well as the most popular one in the NHL. The main difference is F1’s behavior. At lower levels the first forechecker approaches the opposing defenseman cautiously and angles them toward the strong-side boards. In the NHL, F1 is a heat-seeking missile that locks onto the puck retriever and attacks them in a straight line. The difference in execution is due to the professional player’s superior conditioning and skating ability. When F1 is beaten by a pass to the half wall, F2 and F3 are already on their way to kill the next play.
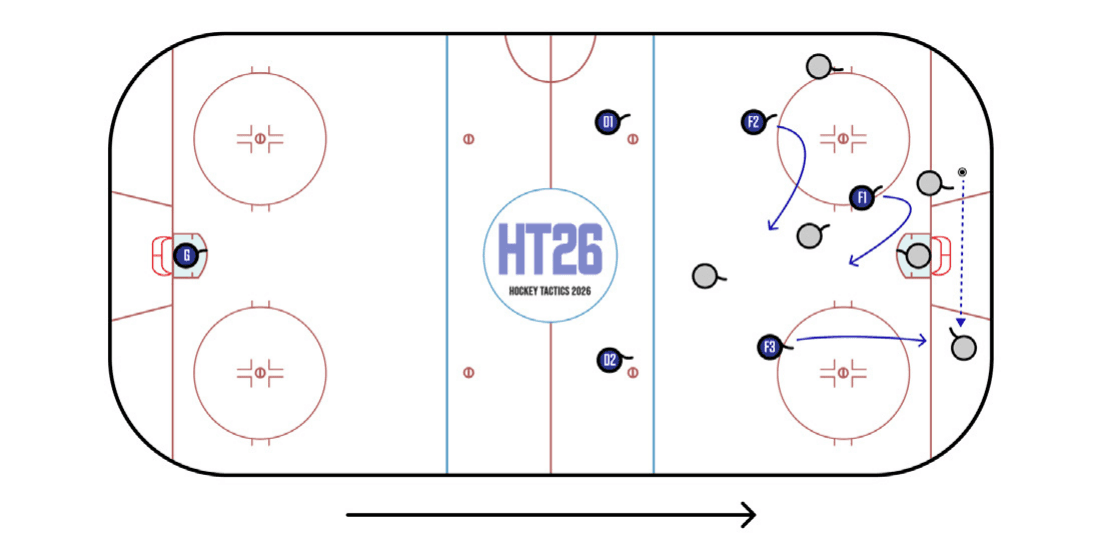
High level forecheckers are quick to exchange roles as the situation develops. As the opposing team goes D-to-D behind its net, F1 and F2 reload through the middle while F3 attacks the pass recipient, becoming the new F1.
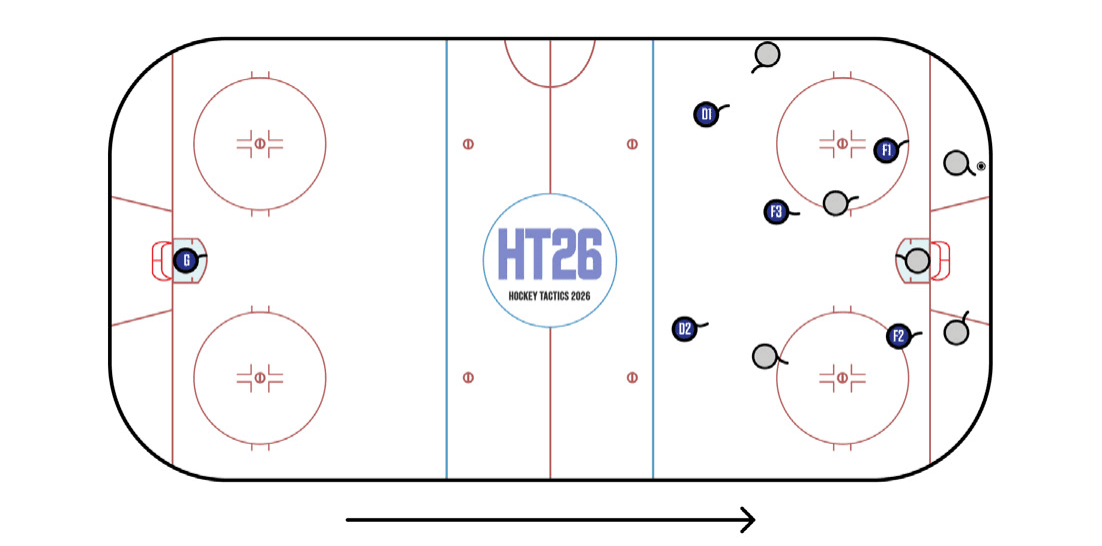
A 2-1-2 forecheck is man-on-man defense. Wingers (or F1 & F2) lock onto opposing Ds. The center (or F3) stays with his counterpart. Ds gap up to opposing wingers. This aggressive formation demands concentration, as dangerous gaps open whenever individuals are late to their checks. The 2-1-2 is most often seen following a faceoff loss, when forecheckers have an easier time attaching to their marks.
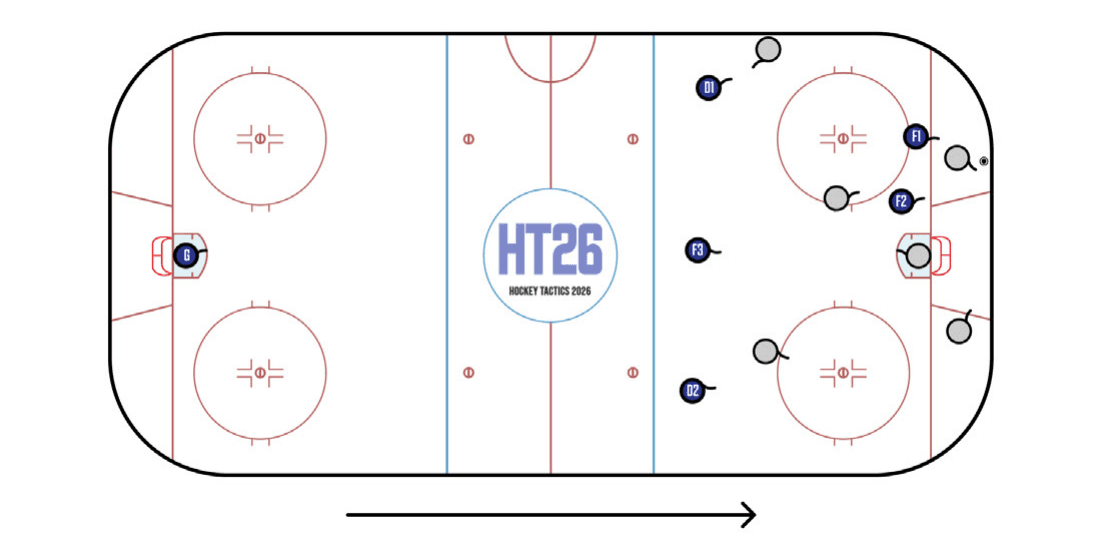
The 2-3 is versatile formation that can be deployed with aggressive or passive intent. F1 and F2 have the green light to hound the opposing Ds, even double-teaming a difficult retrieval if the opportunity presents itself. F3 stays high, along the Ds, to prevent odd-man rushes. The Achilles heel of this formation is the gap between F1/F2 and D1/F3/D2.

Early Tracking (or Reloading) is a habit that allows teams to forecheck in waves. The earlier and harder F1 and F2 sprint toward the neutral zone against a change of side, the more aggressively weak side players can hound the puck.
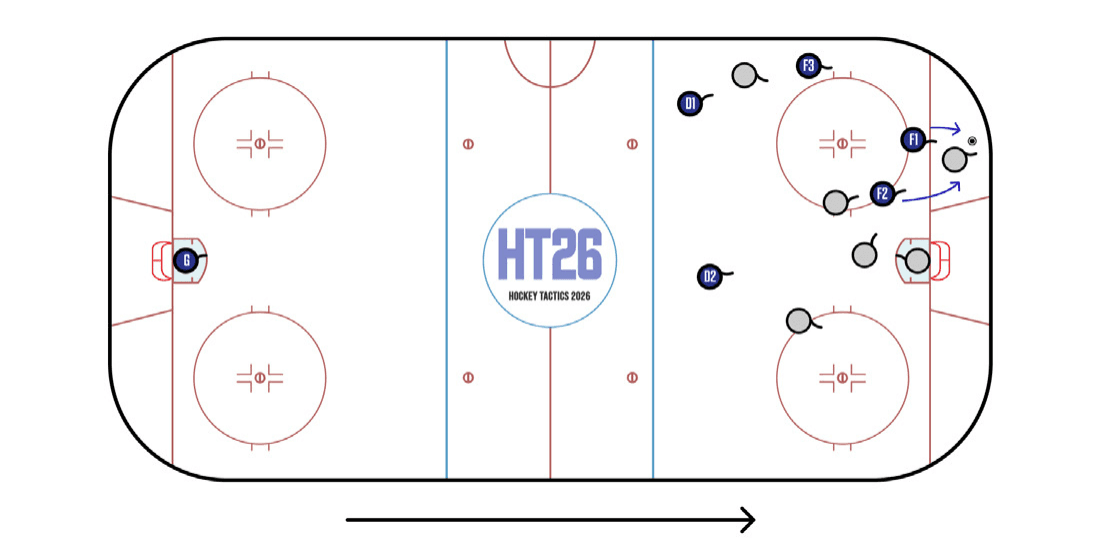
The One-and-a-Half is a development of the 1-2-2. As usual, F1 straight-lines to attack the puck carrier. F2, in the middle, reads the play and either stays above the low forward or double-teams the puck battle. F3 covers the strong-side wall. D2 is ready to pinch. This deceptive forecheck is difficult to counter, especially for teams with a below-average D corps.
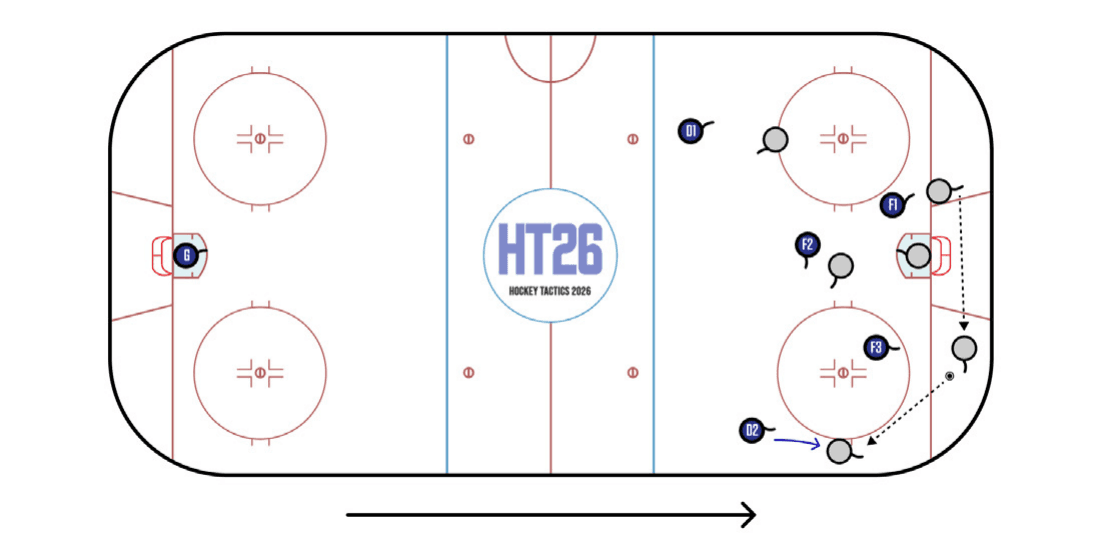
A generation ago pinching was considered a risky play by the majority of coaches. Today it is essentially a non-negotiable. Statistical analysis has confirmed the importance of shot suppression in driving team results. Shots tend to be preceded by entries and exits. The best way for a forechecking team to prevent an exit is to use its Ds to neutralize opposing wingers along the boards, before a breakout has a chance to materialize.
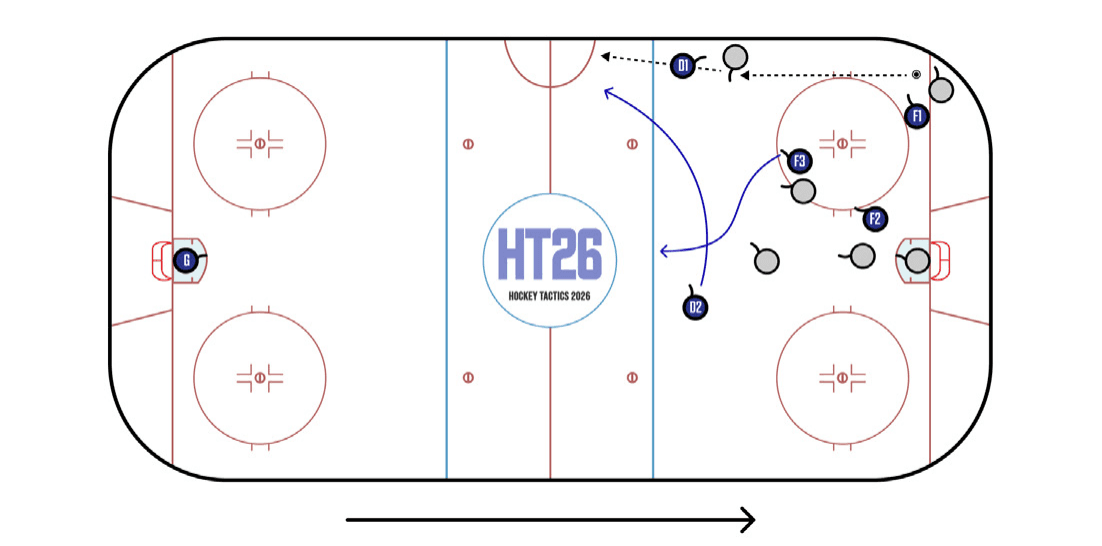
An indirect exit (high flip, glass-and-out, bump-by) can be a great equalizer against an aggressive forecheck. If D1 commits to a pinch and is beaten by an indirect play, D2 intercepts the puck on his partner’s side (a poach, in doubles tennis) while F3 takes over in the middle.
Offensive Zone Possession
16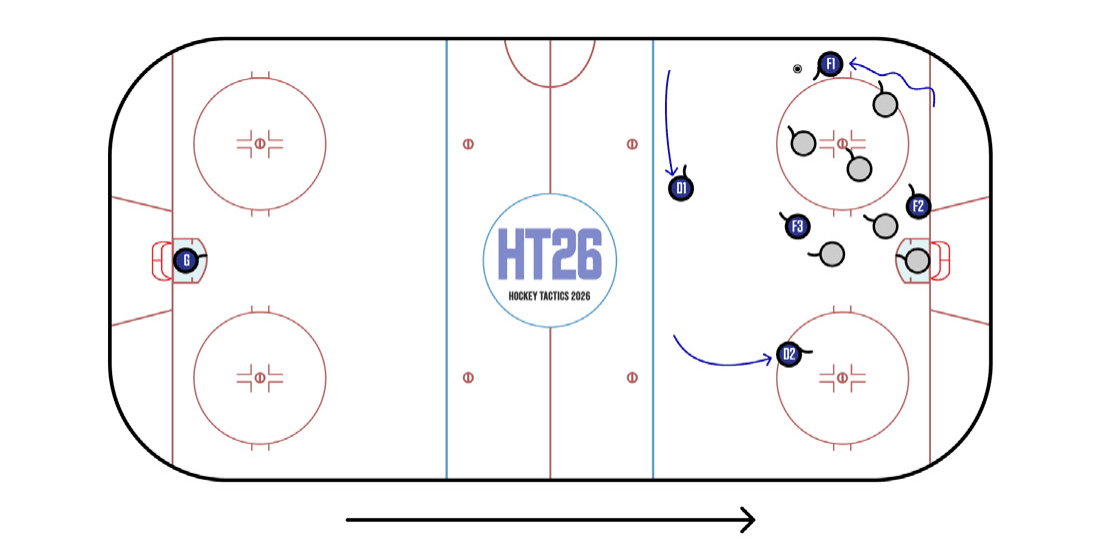
The 1-3-1 is ubiquitous at 5v4 but seldom-seen at 5v5. As F1 carries up the wall, D1 slides across the blue line and D2 attacks down. This movement creates passing options against a passive zone defense, but also exposes the attackers to an odd-man rush against if D1 misplays the puck at the top of the umbrella.
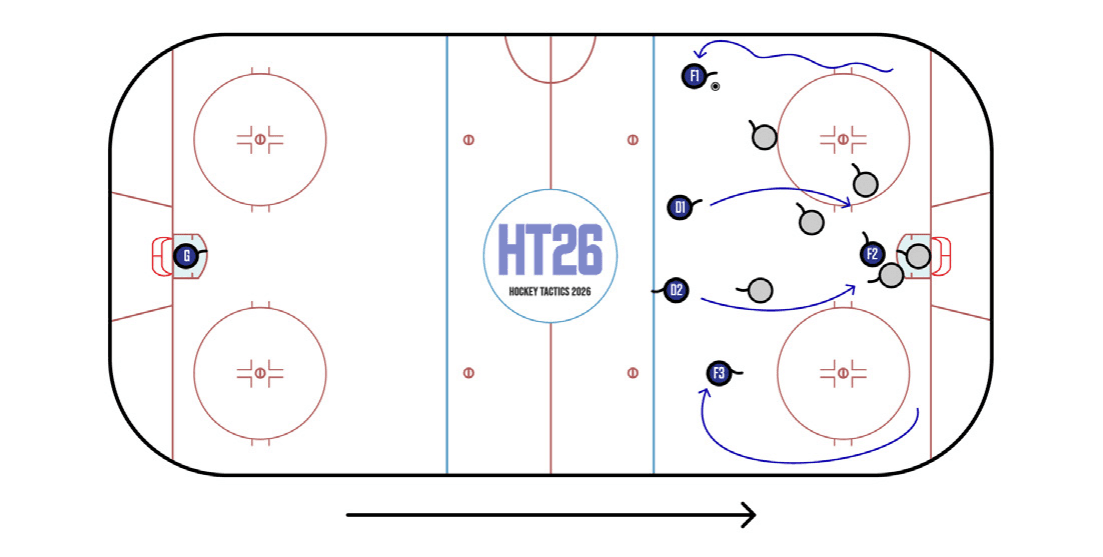
The 1-4 OZP is hockey’s answer to Total Football. One skater (F2) holds the net front to attract defensive attention while the other four curl up and funnel sequentially through the slot. This creates a series of mini rushes that catch zone defenders flat-footed and force man-on-man defenders to over-extend. Once at the net, attackers keep their speed and reload to the blue line to stay above a potential counter-attack.
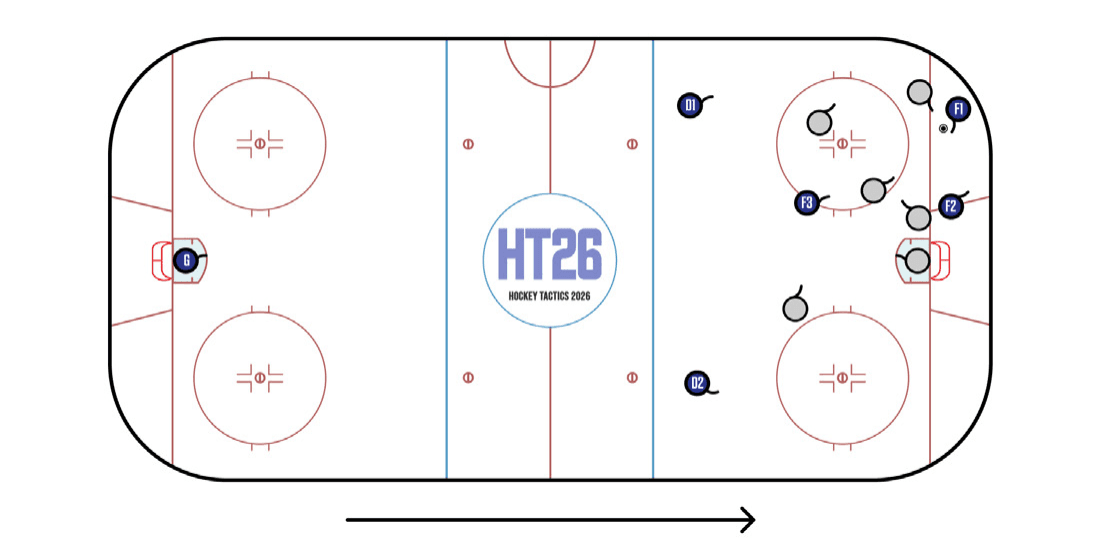
The 2-1-2 is our sport’s standard OZ formation. As F1 emerges from the corner with the puck, F2 may either stay on the strong side (the same side as the puck carrier) or fade toward the opposite corner. F3’s job is two-fold: get open between defenders and create a slot threat, and stay above the opposing team’s third player in case of a counter-attack.
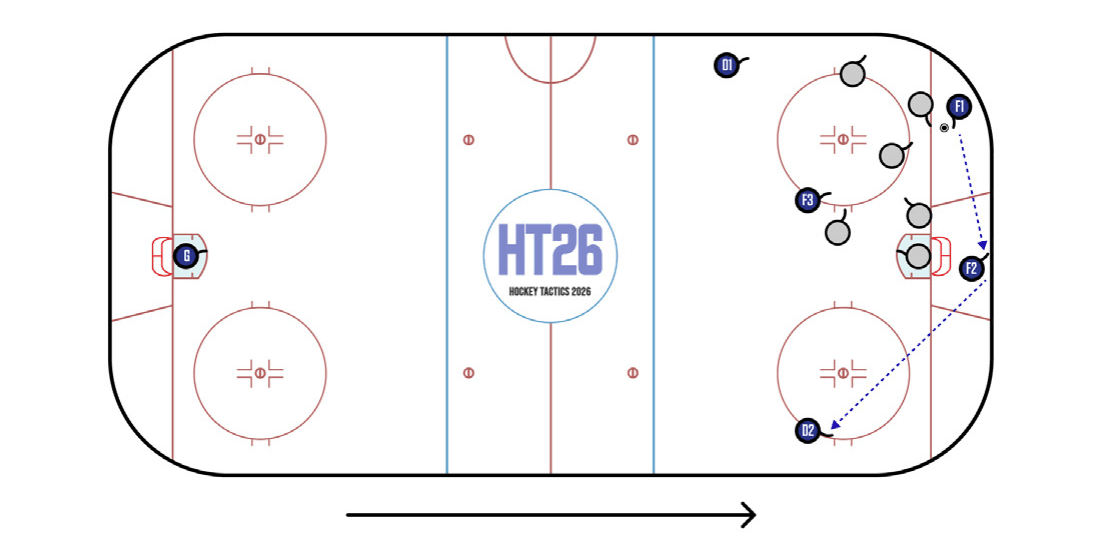
Basic principle: expand on offense. If F1 finds F2 behind the net, D2 (the weak-side defenseman) can sneak down the boards to become a passing option as all five opponents react to the change of side.
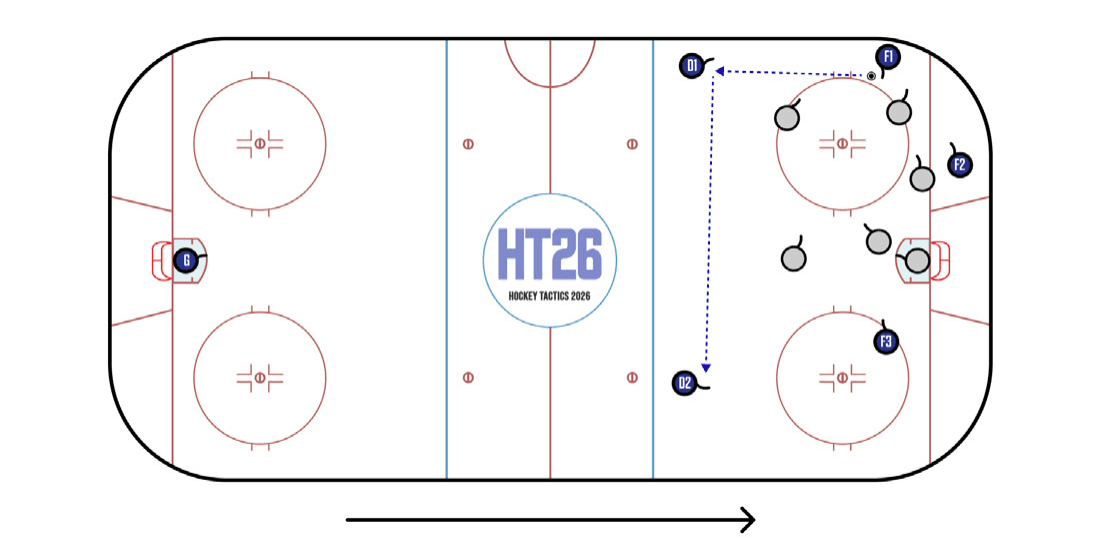
An important innovation in hockey tactics is the adoption of the 2-3. By inverting the old-fashioned Spread, skilled attackers can set up a High 3v2 and attack downhill. Rebounds and loose pucks typically wind up in the opposite corner, forcing defenders to turn their feet and neutering their counter-attack potential.
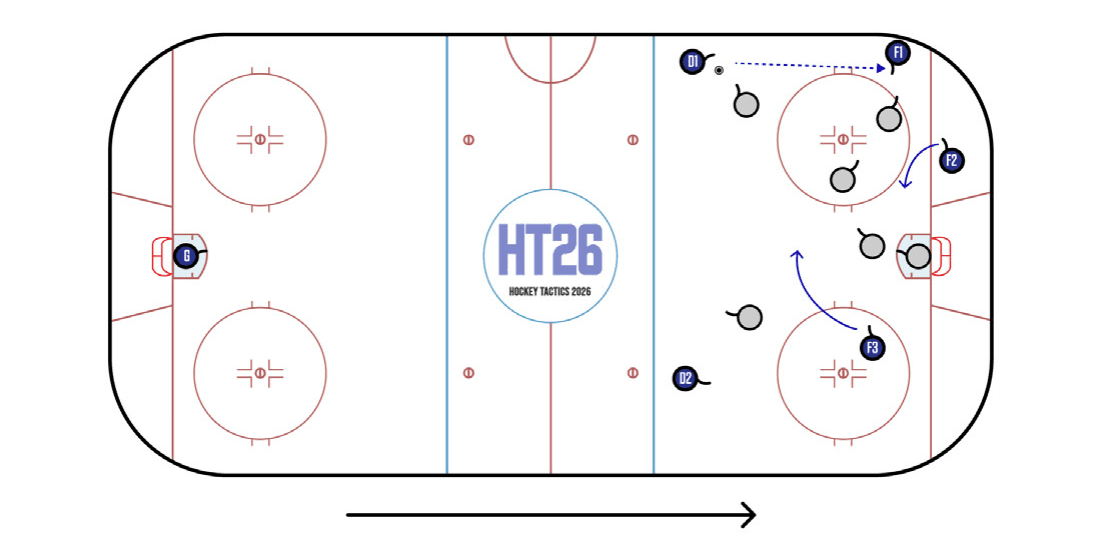
Basic principle: contract on defense. If F1 is in danger of losing a corner battle, the three high players short the zone and sit atop opposing forwards to pre-emptively deny the breakout. This proactive defensive play forces the opposing team to either flip the puck out for F3 to retrieve, or bump it to the opposing corner against D2’s pinch.
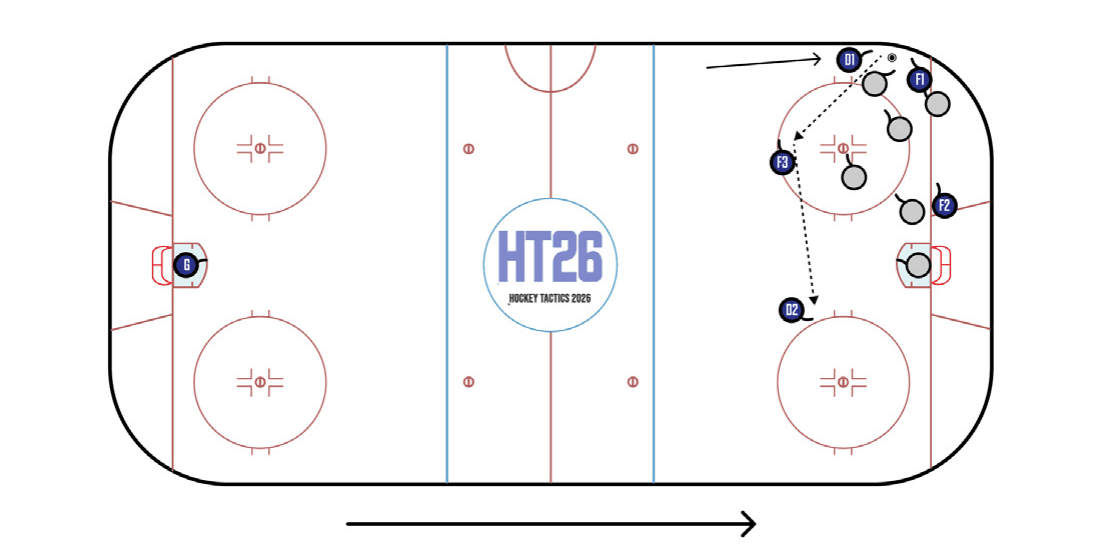
If defenders are slow to react to a Low to High pass, the attacking team can create an advantage by immediately going High to Low. As F1 receives the puck, F2 and F3 skate behind defenders to create high-danger catch-and-shoot opportunities.
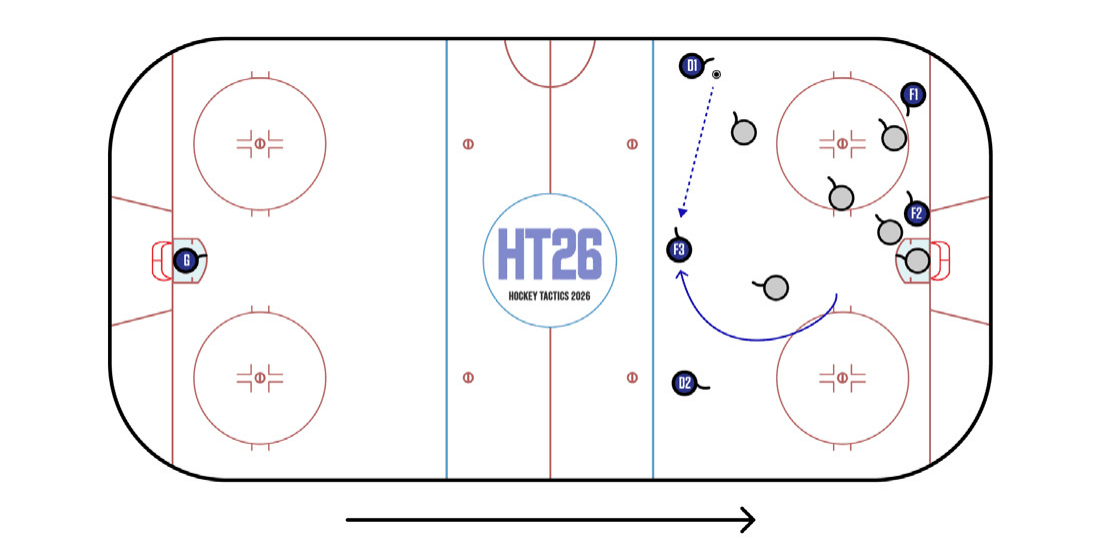
NHL teams defend low plays with all five skaters overloading the area around the puck. The Low to High is a conservative play that teams use to maintain possession. F1 moves the puck to D1 in order to create time and space. F3 vacates the slot and moves into open ice in the opposite corner to stretch the defensive structure.
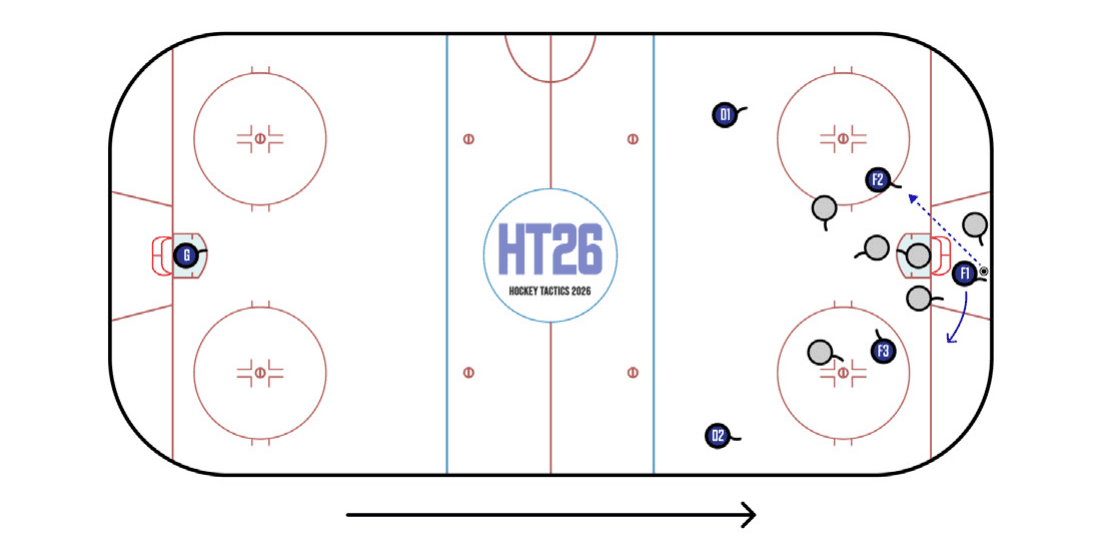
The Polgz goal is a trick play whereby the puck carrier threatens a forehand wrap-around but instead makes a behind-the-back backhand pass to surprise opposing players. Behind-the-net plays have a high conversion rate against disorganized defenses, but may result in dangerous rushes against when misused, as the puck is essentially being passed toward one’s own net.
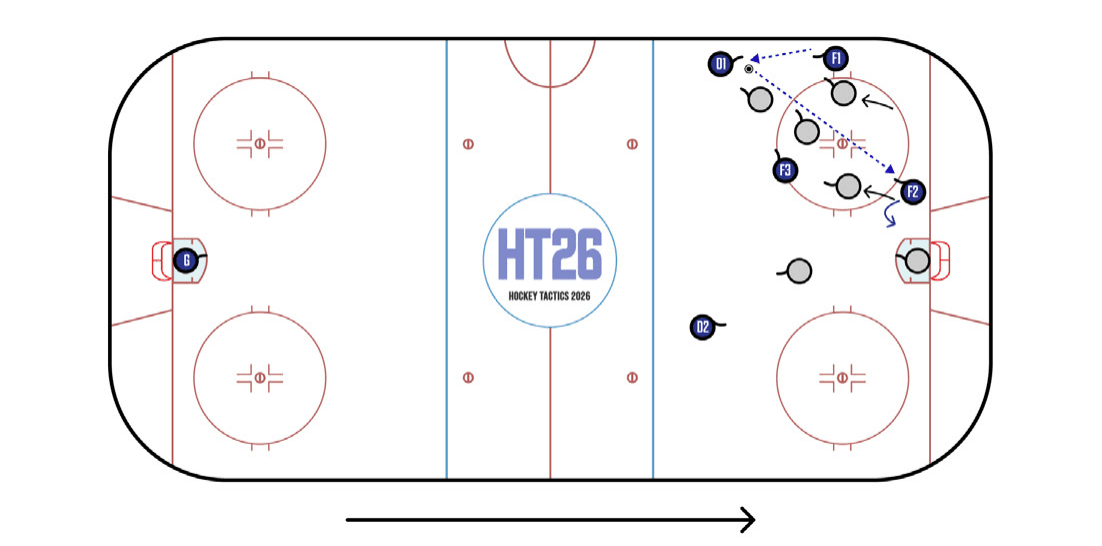
Creating offense means mastering both space (landing at the right spots relative to others) and time (knowing when to stay and when to skate). If the attacking team is able to quickly contest a counter-attack, then there is advantage in F2 delaying their backcheck and hanging out momentarily in the space vacated by opposing defensemen, who are sprinting to join the developing rush. Aggressive early defending by D1, F1 and F3 may well create a mini-breakaway for F2.
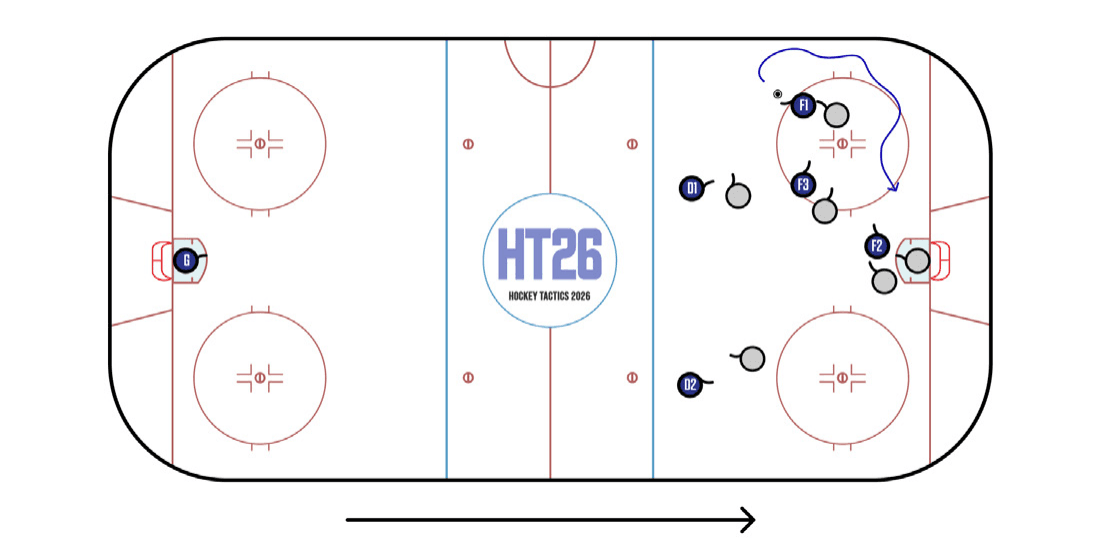
The High Cutback is a powerful tool against aggressive man-on-man defending. F1 draws in the nearest defender and skates away from the net while staying off the wall. With the defender within touching distance, F1 cuts back and is rewarded with a clear path to goal.
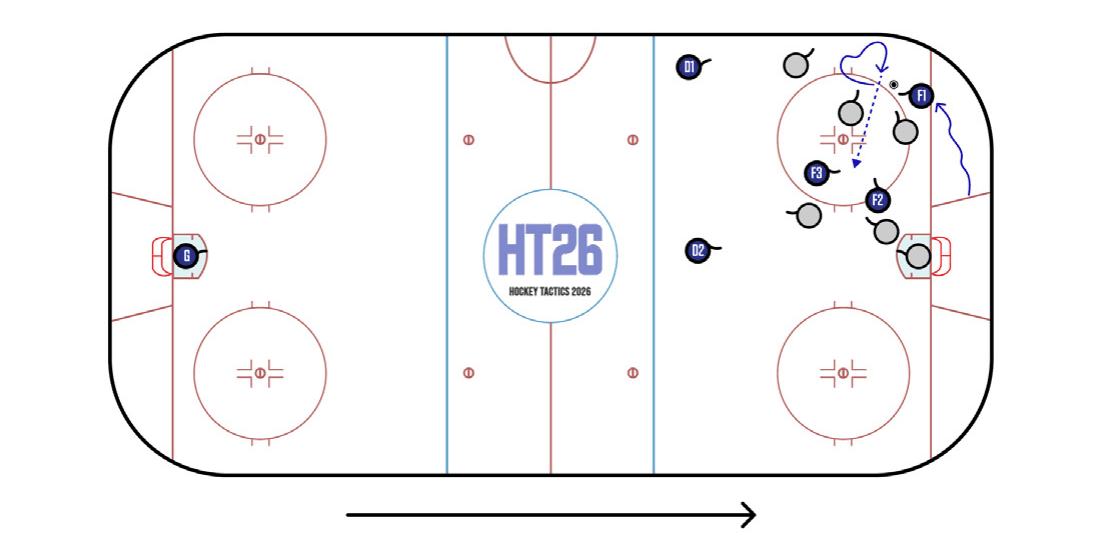
The Low Cutback is most effective against an overloading (Five Tight) defensive structure that plays 5v3 in one quadrant. The setup is similar to the High Cutback, except F1 will likely not have a lane to the net coming out of the turn. Instead, the ideal play is to make a slip pass to F3 or F2 in the high-danger slot area.
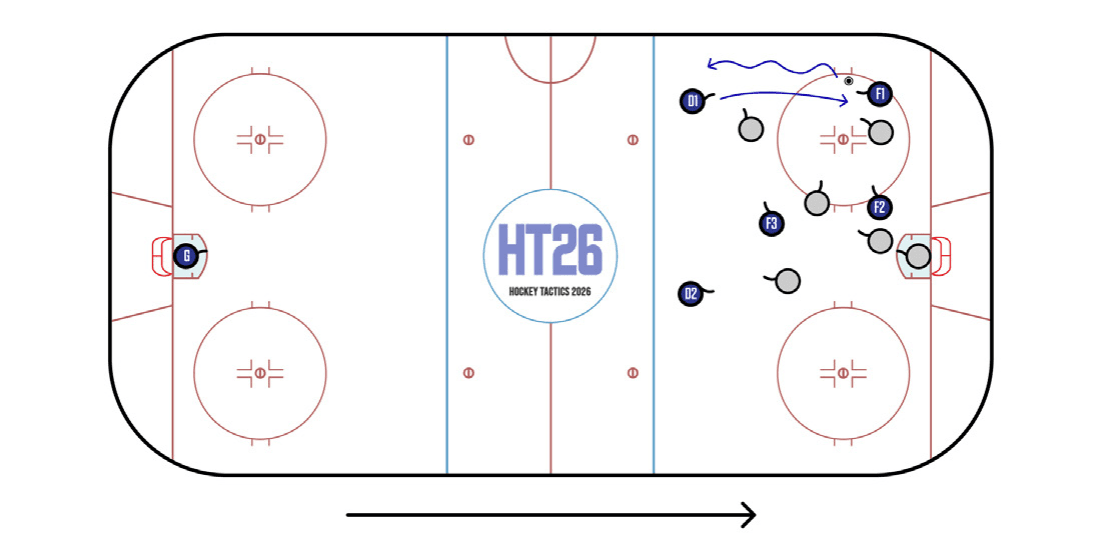
OZP player and puck movement challenge defensive structures by forcing individuals into decisions. As D1 and F1 cross, the two nearest defenders must either mirror the attackers’ movement or stand their ground and hand off coverage to each other. A poor (or late) decision leads to an offensive opportunity.
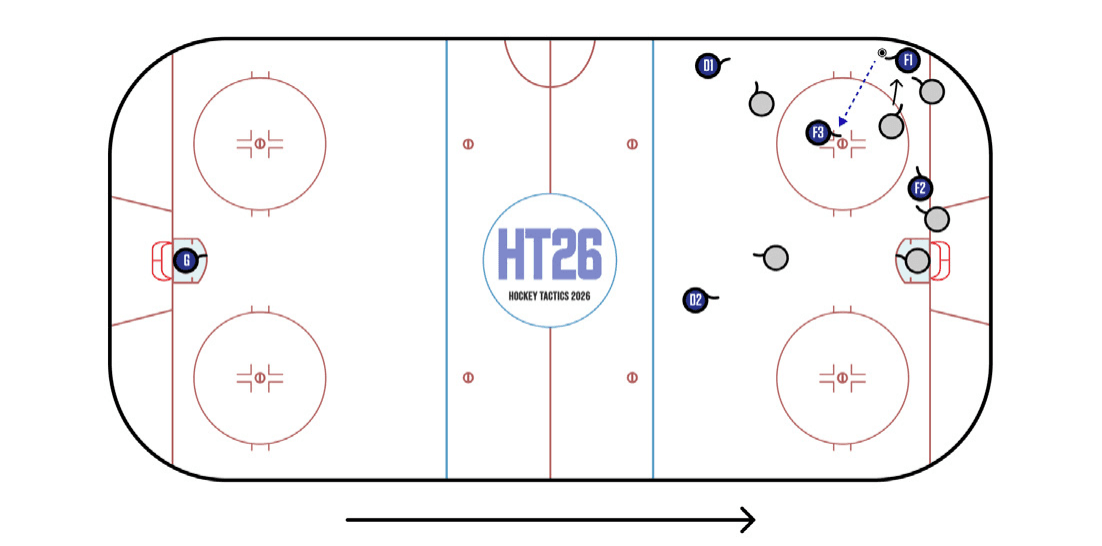
A Five Tight defense offers solutions against many OZ plays, but it struggles to neutralize the short pass from F1 in the corner to F3 atop the strong-side faceoff dot. The low forward or the strong-side winger could shift over to cover F3, but that would open up other options for F1 to exploit.
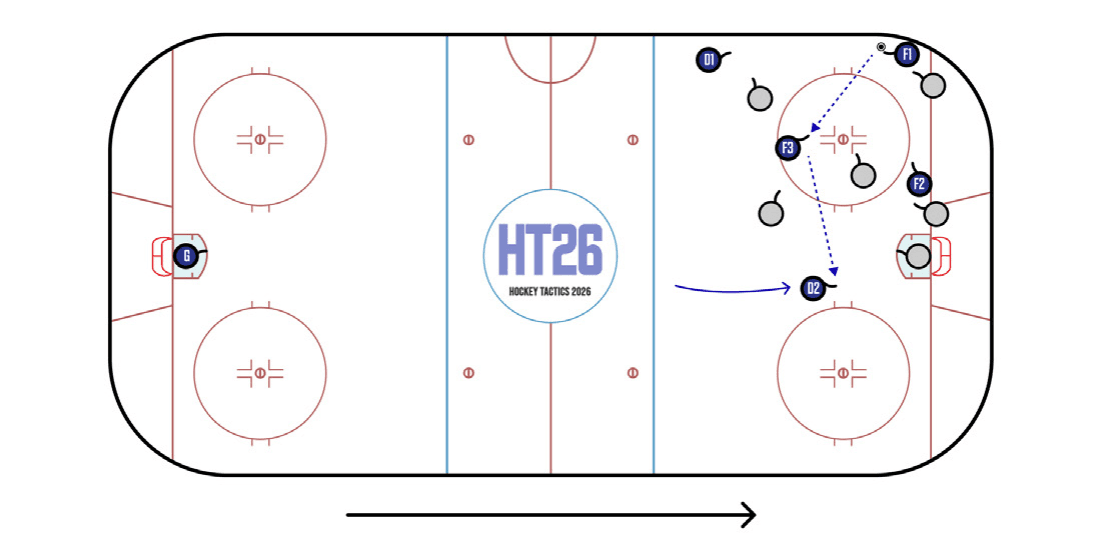
F3 only has a split-second with the puck on a Dot Support play before multiple defenders converge. An active D2 creates a follow-up play by sprinting down the weak side and calling for a pass. D2’s credible scoring threat may force defensive forwards to give more space to F3 the next time around.
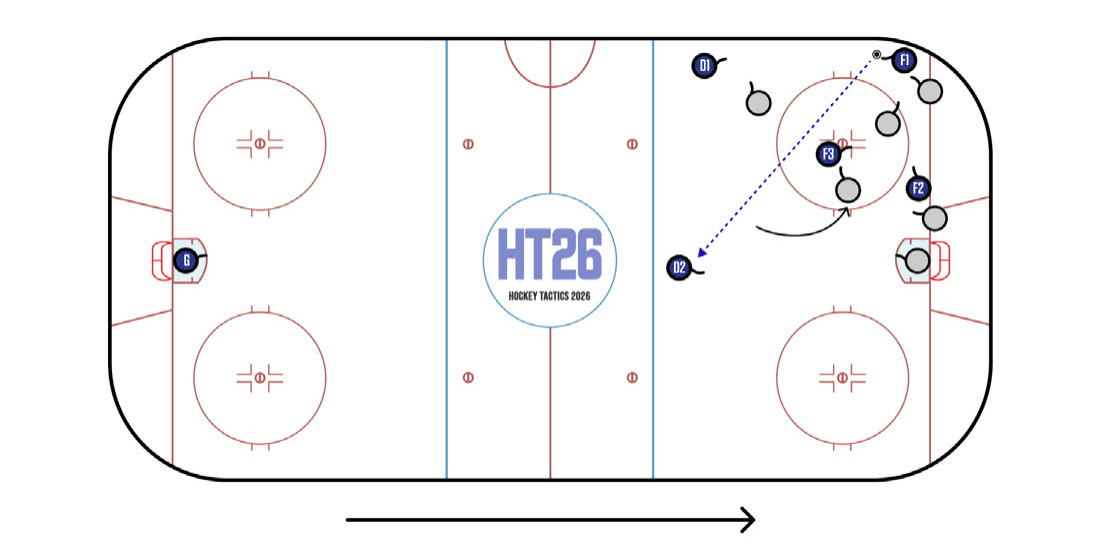
If the opposing weak-side forward collapses to cover F3 at the strong-side dot, F1 can exploit the passing lane between the corner and the weak-side defenseman. A long diagonal pass forces the defensive structure to shift horizontally and vertically, potentially creating mismatches.
Penalty Kill In-Zone
6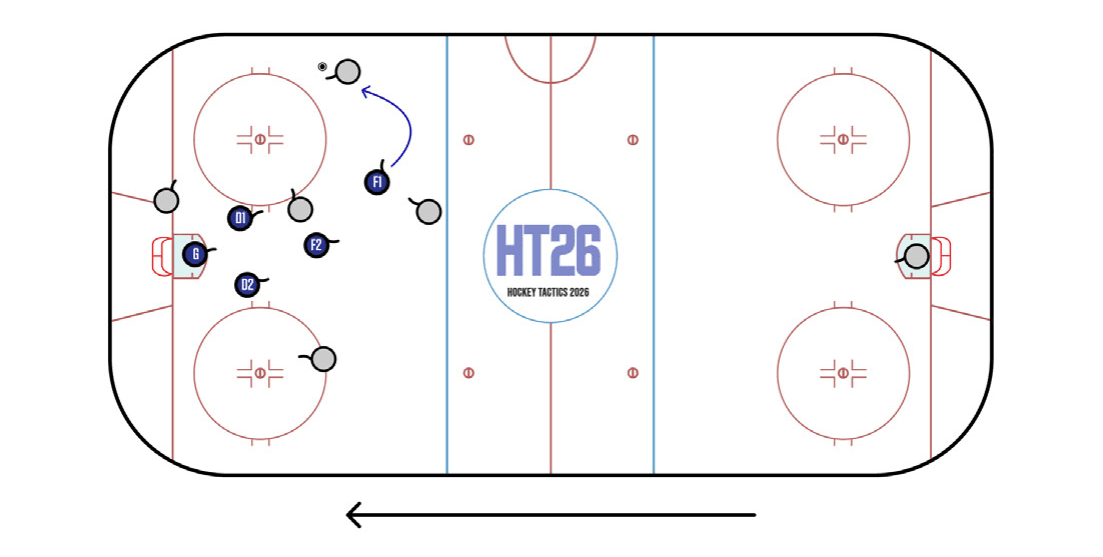
The Wedge + 1 is most effective against a 1-3-1 powerplay that relies on cross-seam plays from its flankers. F2, the weak-side forward, cuts off the critical east-west passing lane while keeping tabs on the bumper player. On downhill plays, F1 traps down to push the flanker outside the dot lane while deterring a pass back to the point.
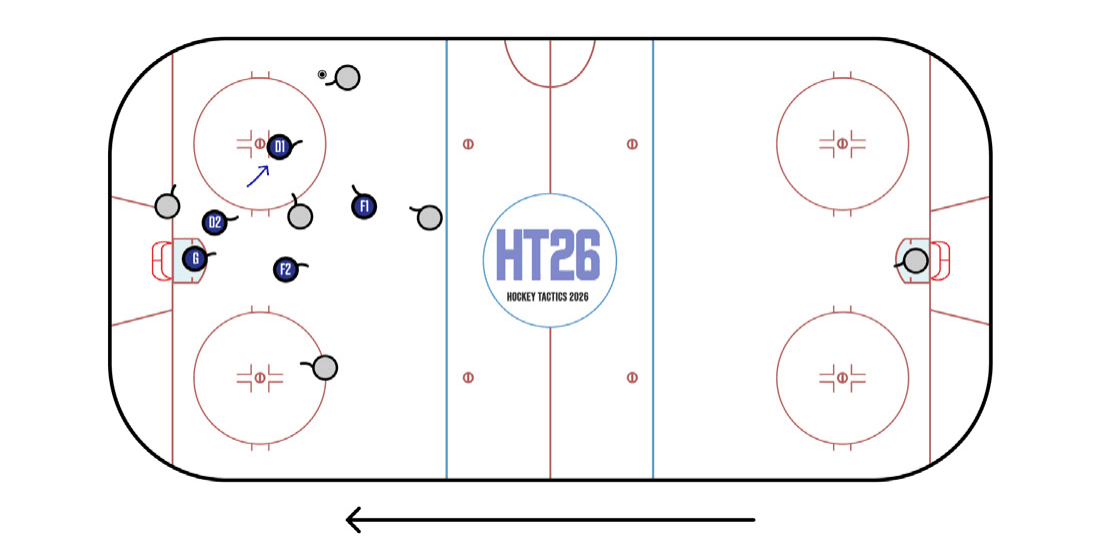
A more aggressive alternative to the 1-1-2 is the 1-2-1. Rather than staying near the strong side post, D1 flexes out (see above) to challenge the flanker, thereby creating a diamond shape. In theory a Diamond PK suppresses shots and prevents zone time, but in practice it is often vulnerable to high danger chances originating from the bumper and back door areas.
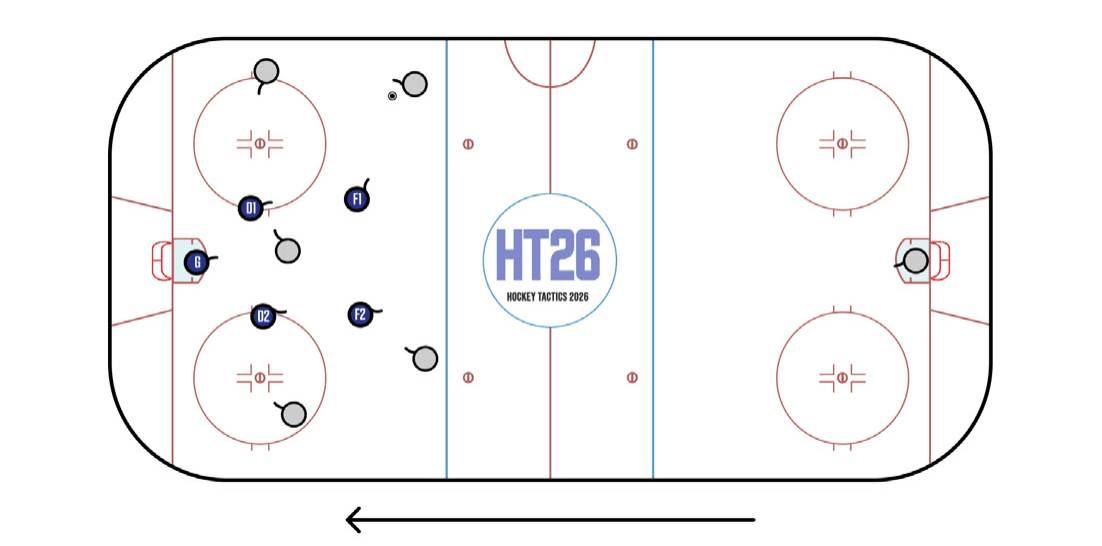
The traditional Box PK features two defensemen near the net and two forwards pressuring the points. It is a logical arrangement against PP formations that have multiple players standing near the blue line, such as the 3-2 Spread and the 2-3 Umbrella. The gap between Fs and Ds can be exploited by a well-run 1-3-1.
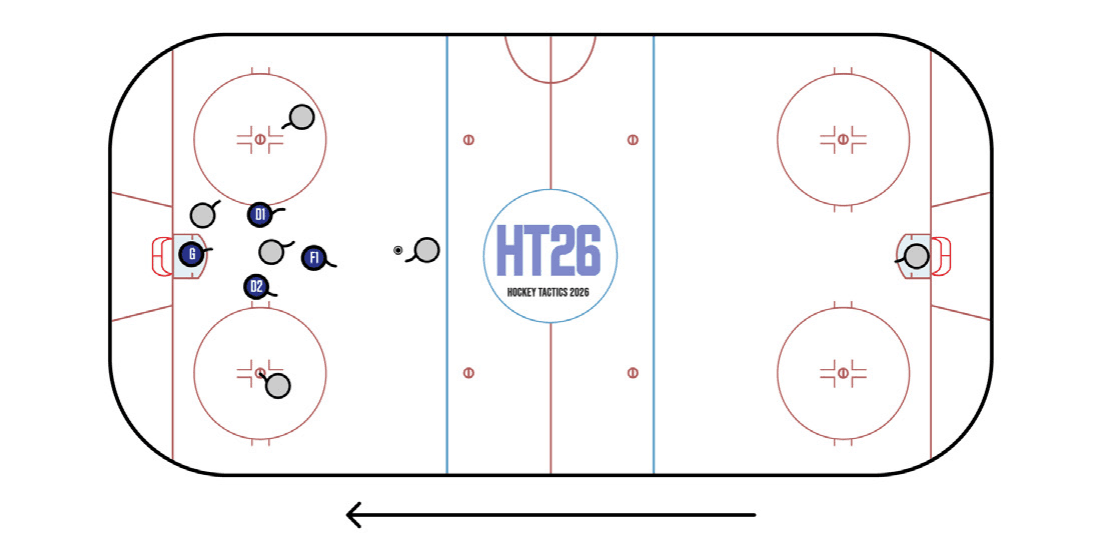
A Triangle with two defensemen near the net is the most viable formation in a double shorthanded situation. The compact 1-2 shown above prevents cross-seam one-timers, which are the preferred scoring pattern in a 1-3-1. The powerplay can either take lower-danger shots and hope for tips, screens and rebounds, or morph into a 2-1-2 (see Powerplay section).
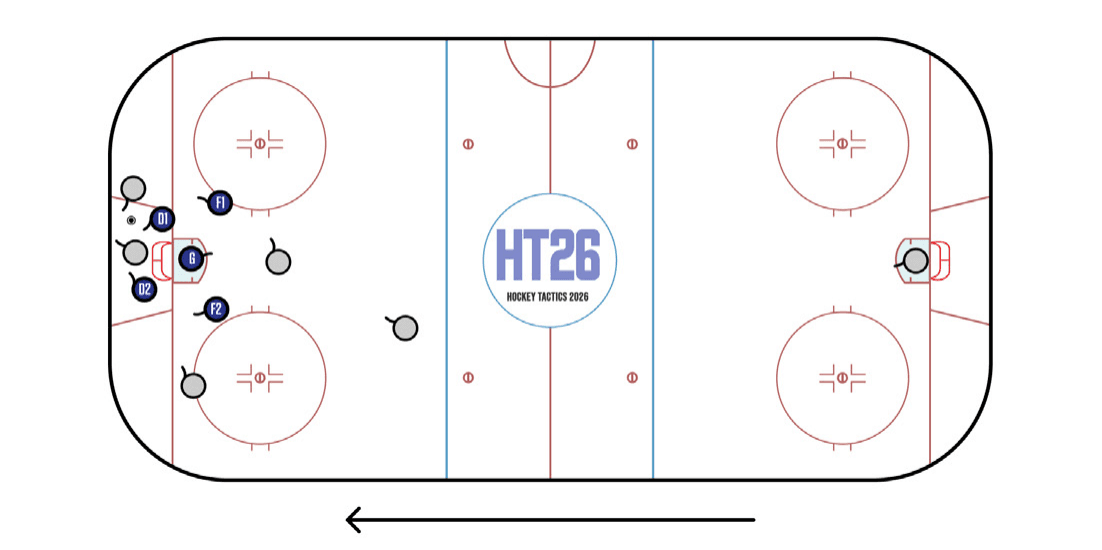
By and large, teams defend more passively when down a player than at even strength. Exceptions apply in Four Go and Behind the Net situations. If the PP makes a poor pass to the area behind the net, both penalty killing Ds swarm the puck while Fs collapse. The net acts as an obstacle preventing the PP from accessing the slot with a direct pass, so it’s a worthwhile gamble to pressure aggressively in hope of getting a quick clear.
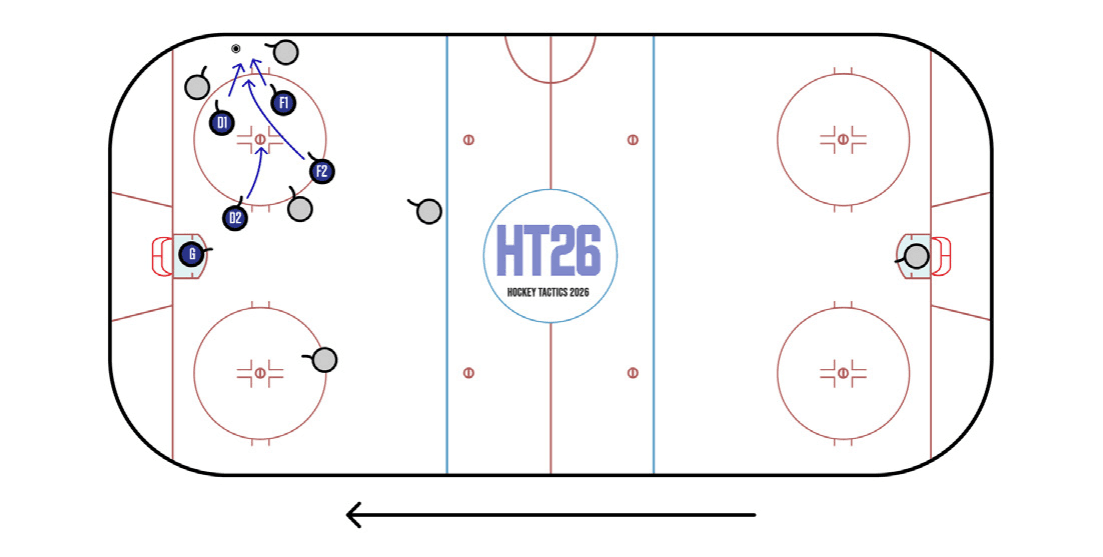
The Four Go is an essential part of any successful penalty kill. On a 50/50 wall puck, all four PKers sprint to create a numerical advantage. The idea is to win the puck quickly and clear it out of the zone. F1, F2 and D1 fight along the boards. D2 stops a few stick lengths away in case the puck squirts out of the pile. The Four Go can be associated to any of the PK schemes described above, though PKers in an aggressive 1-2-1 or 2-2 will be quicker to the puck than those playing a static 1-1-2.
Penalty Kill Forecheck
4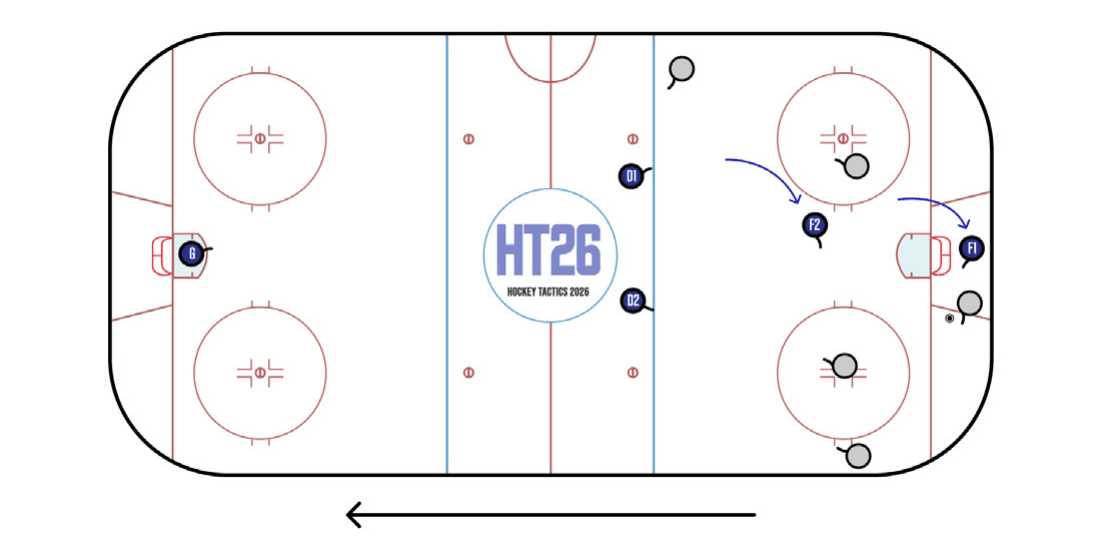
The 1-1-2 is an evolution of the 2-2 that is better suited to defending modern PP breakouts. F1 forces the puck carrier to one side and may chase (flush) behind the net. F2 stays above the next layer and continues the job of forcing the puck outside the dot lane while F1 recovers through the middle. This versatile formation is equally effective against Four Back and Drop plays, provided that the penalty-killing Ds are mobile enough to deny entries in tandem.
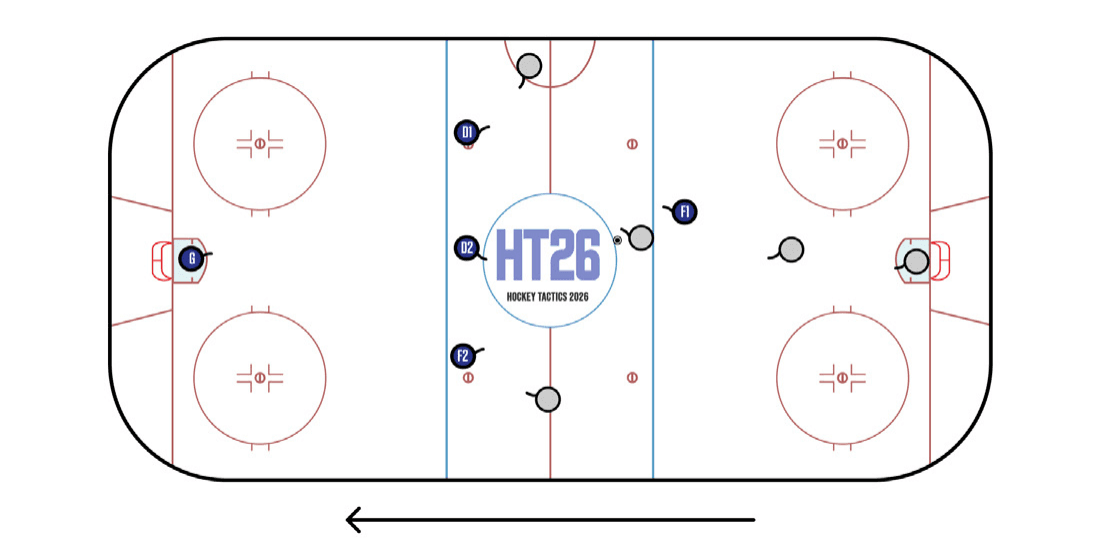
The 1-3 PK forecheck works similarly to a 1-3-1 neutral trap. F1 provides moderate pressure up-ice (no flush) while the three remaining skaters form a wall just outside of the blue line. Compared to the 1-1-2, the 1-3 is safer defensively but less likely to generate shorthanded scoring opportunities. The 1-3 is the most popular PK forecheck in the NHL due to its effectiveness against Double Drop breakouts.
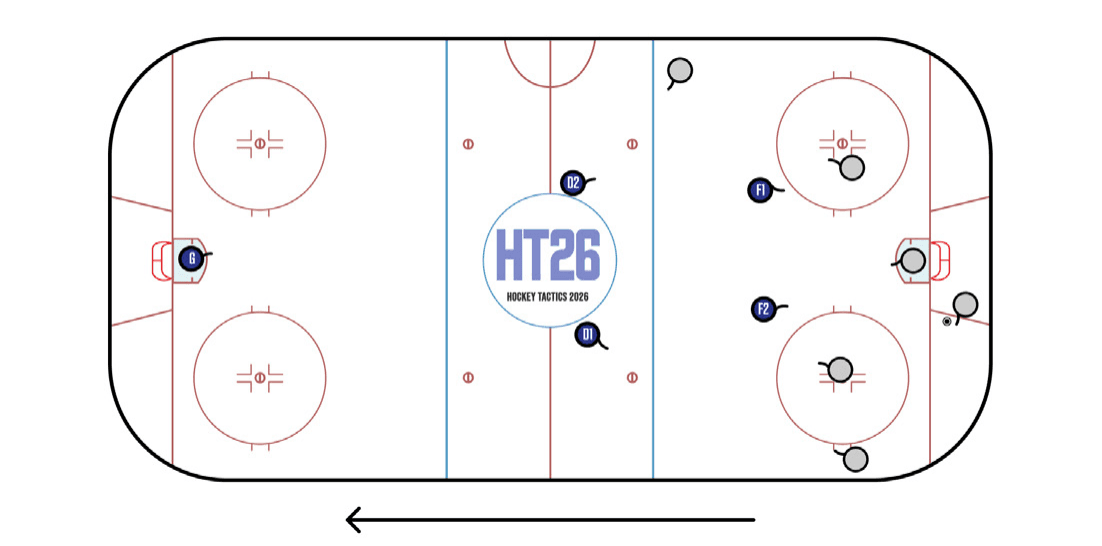
The 2-2 is the simplest and most straightforward arrangement when foreching 4v5. F1 and F2 work together to force the puck wide while the Ds stay in the neutral zone. Few NHL teams use the Box forecheck as it matches up poorly against Single- and Double-Drop breakouts.
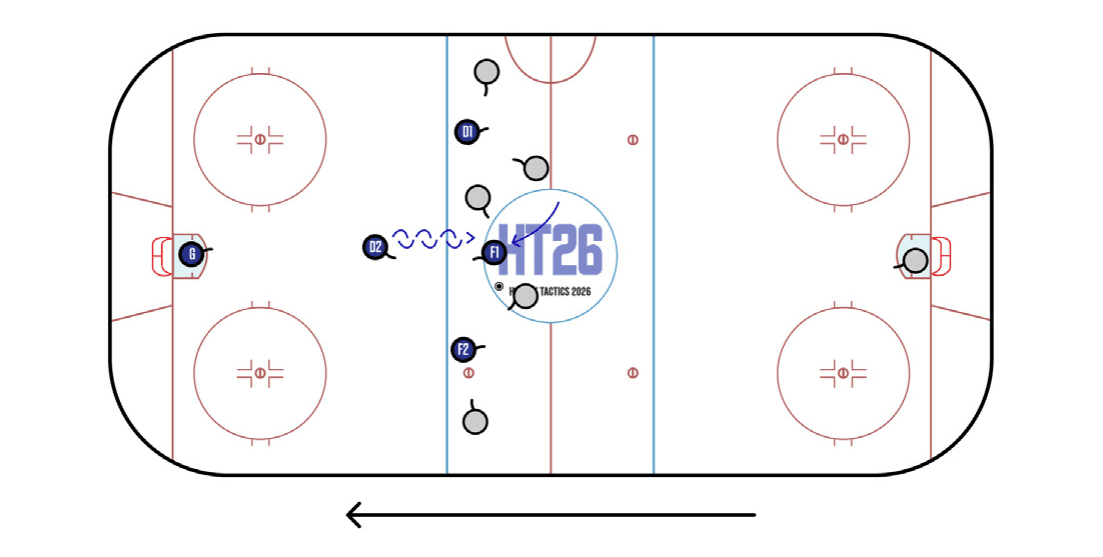
The 3-1 is a variant of the 1-3 used by certain NHL teams against the Double Drop PP BO. After forcing the opposing defenseman into making the drop pass, F1 clogs the middle while D2 skates backwards in anticipation of a dump-in.
Powerplay In-Zone
6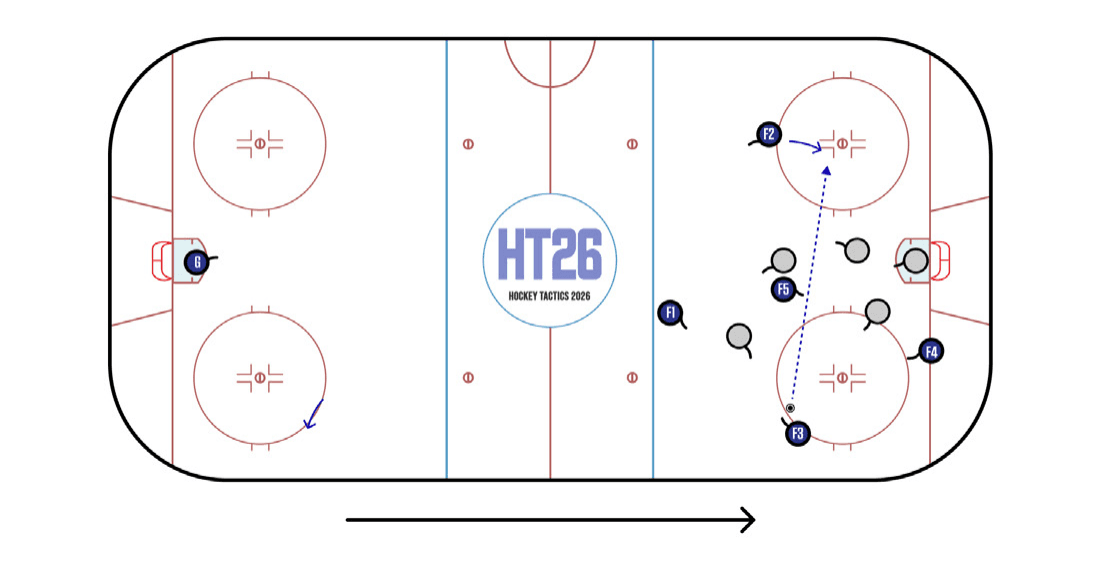
The 1-3-1 is the geometrically ideal powerplay setup. Player roles resemble those in a basketball half-court offense. The Point Guard (1), typically a defenseman, is a high playmaker and is relied upon as the last player back in case of turnover. The Weak-Side Flanker (2) stalks the area near the weak-side dot, looking to score off a cross-seam pass. The Strong-Side Flanker (3) is the unit’s primary playmaker. By virtue of their strategic positioning near the half-wall, they can create a scoring chance with an accurate pass to any teammate. The Net Player (4) stands in front of the opposing goalie when the puck is at the point, then relocates to the strong-side goal line as an additional passing option when the puck is passed to the flank. The Bumper (5) is the hub of the unit. The role calls for versatility, as this player must be adept at shooting off the catch, making passes in small areas and retrieving loose pucks below the goal line.
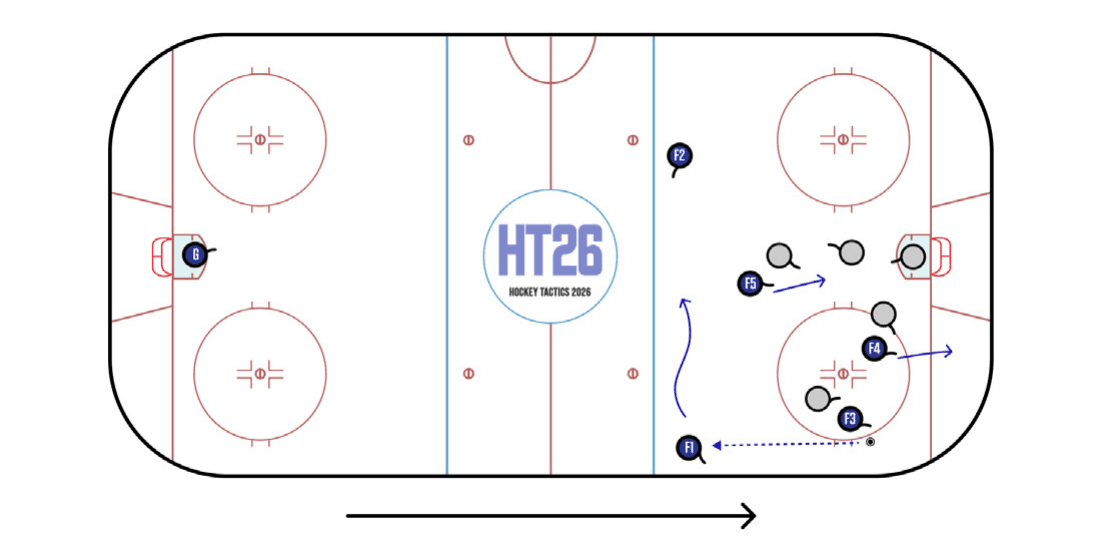
After a successful zone entry, #4 and #5 finish their routes toward the net to push PKers back. #1 moves to the strong-side wall so that #3 can make a blind back pass under pressure. #2 stops just inside the blue line as a D-to-D option, or to defend a turnover. Once in full control, #1 walks the blue line and the other skaters move into their assigned spots.
A popular variation of the 1-3-1 has both flank players on their strong sides (lefties on the left and vice versa). This setup allows the passer (3) to better protect the puck from penalty killers on their way toward the net, while providing the receiver (2) with an opportunity to either shoot or pass after the catch.
The 2-1-2 is more often seen at 5v3 than at 5v4. The bumper occupies the PKers’ attention while the low players set up an over-and-up sequence for the shooter in the high slot. This play is effective on a two-man advantage, as the point players can aggressively shorten the zone without the fear that a blocked shot will lead to a rush against.
Two low players create tips, screens and rebounds. Three high players are responsible for setting up and getting the puck through to the net. This setup is more defensively sound than the 1-3-1 and can be effective against passive PKs that over-collapse to the slot.
The main advantage of the 3-2, when compared to the 1-3-1, is the availability of a back-door option. Instead of standing in the slot, Player 5 moves outside the PK structure and stands near the far post. A quick down-and-over passing sequence creates a tap-in opportunity.
Powerplay Breakout
4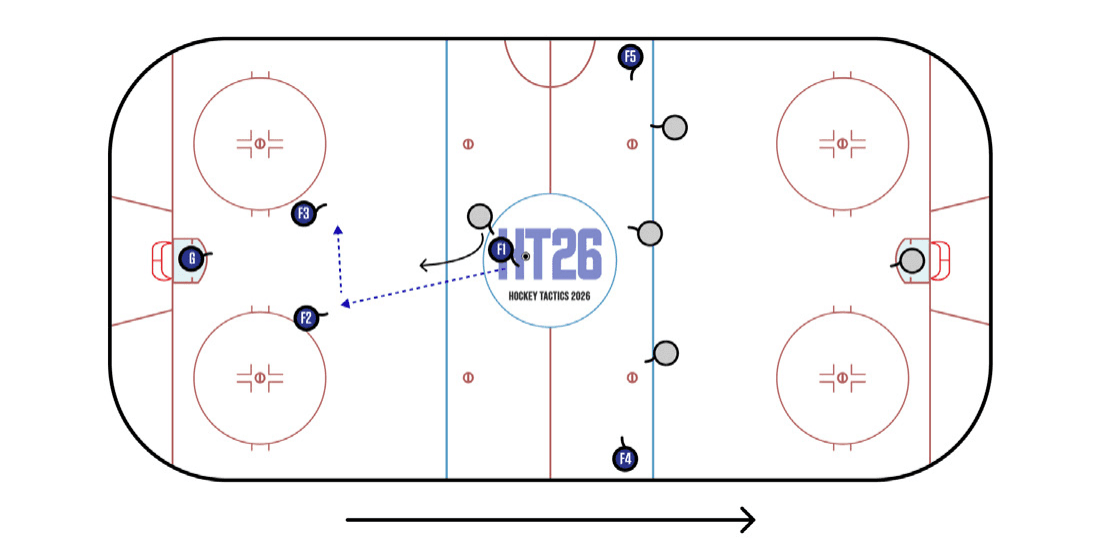
#1 waits for #2 and #3 to track back, then carries toward the red line. This forces the PK forecheck to set, allowing the two drop options to build speed against flat-footed defenders. The Double Drop is easy to pre-scout and can be tedious to set up. But it is also the highest-percentage PP breakout in terms of entry success rate.
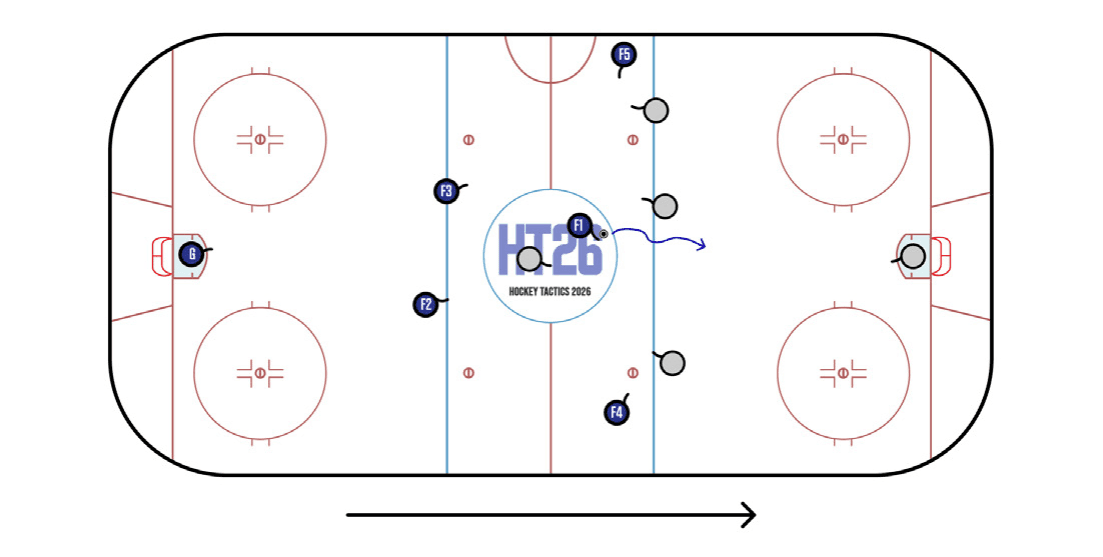
The Double Drop’s dull predictability sets the stage for a devastating trick play. If the PK forecheck overplays the drop pass, #1 fakes the pass back and carries through for a breakaway.
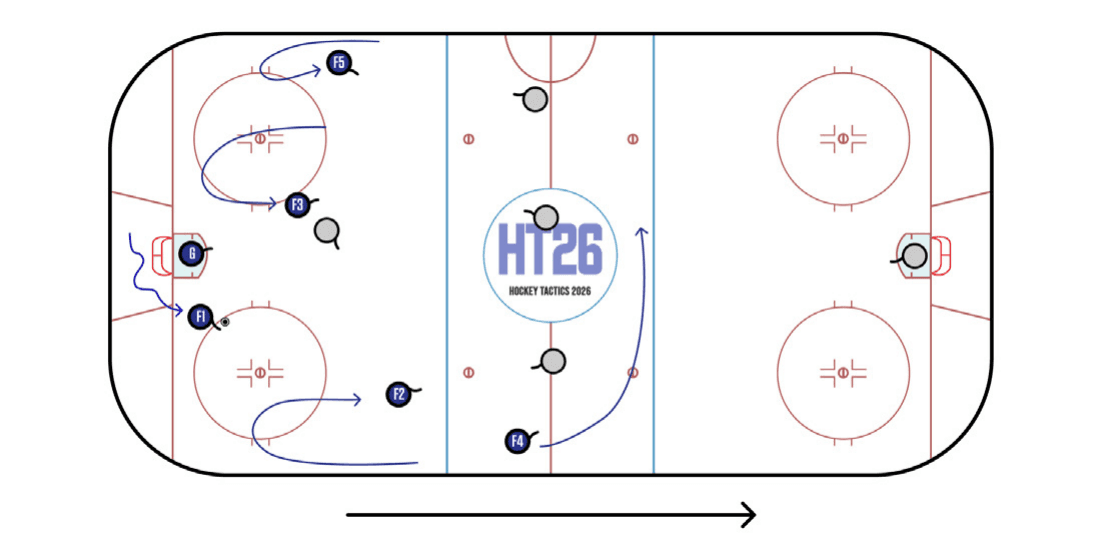
Four back is a blanket term for a variety of PP breakouts that don’t involve a drop pass. #4 pushes up and then moves across the offensive blue line to manipulate the back half of the PK structure. The remaining skaters swing back to build speed and manufacture passing options. In the example above, #3 and #5 form a Double Left Swing. #2 stays right and skates into the space vacated by #4. Certain European teams use a Five Back for additional low support, but the absence of a dedicated push player allows the PK to step up as a unit and deny the red line.
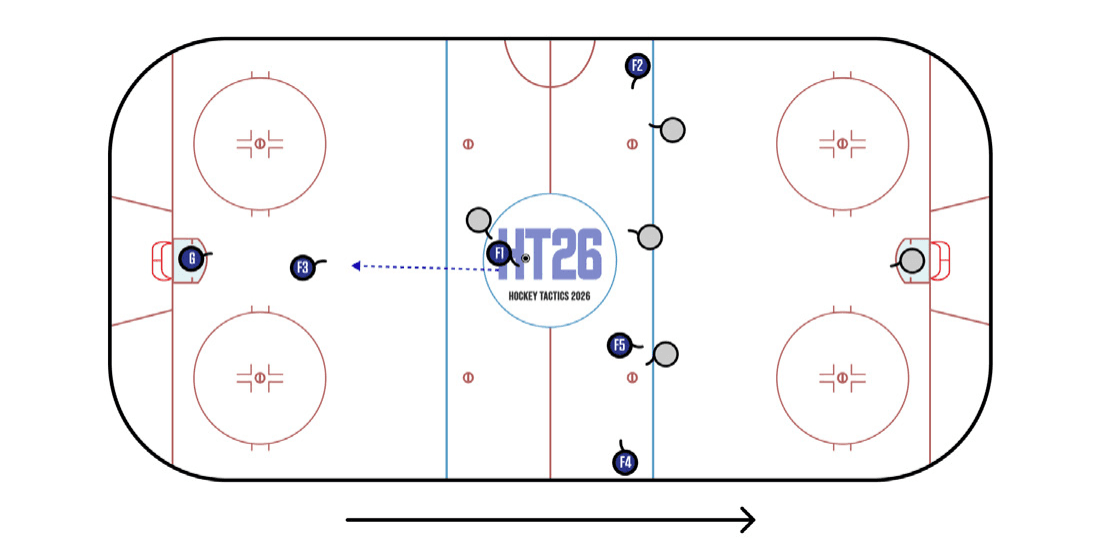
The Single Drop is a viable option for teams with an elite puck carrier (EDM – McDavid, COL – MacKinnon, NJD – Jack Hughes, etc.). #1 can either pass the puck back to the drop option (3), or attack 4v3 with the other three skaters posted near the offensive blue line.
Rush
6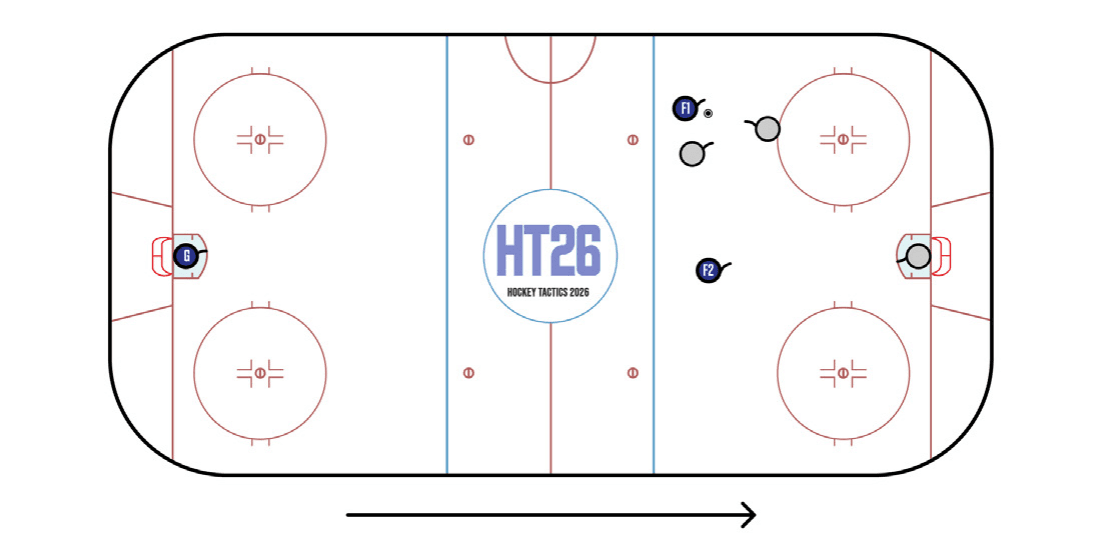
2v1 rushes are few and far between, but a savvy offensive player can manufacture 1v2s multiple times per shift. By baiting a double-team, F1 effectively creates an odd-man situation elsewhere on the ice. Over time, players who consistently excel in 1v2 situations force opposing players to defend more passively, which creates more time and space to extend the possession.
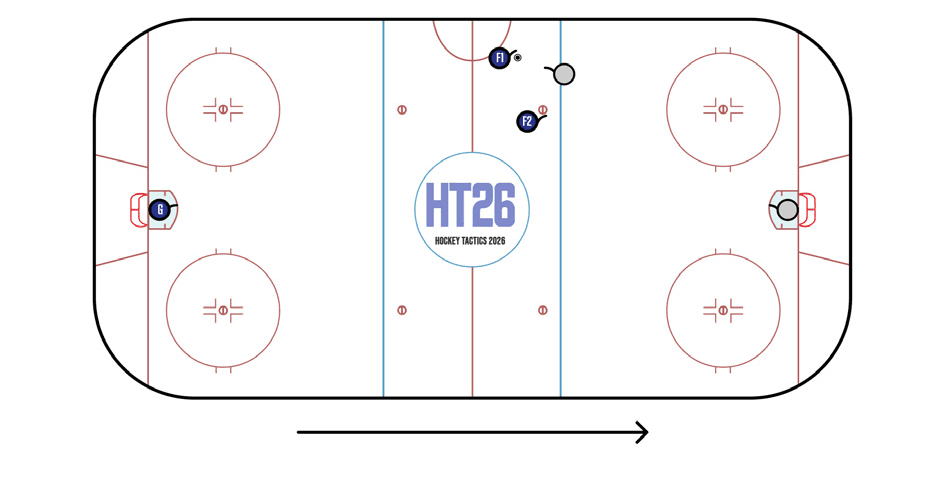
A 2v1 rush is one of the highest-value offensive plays in hockey and also one of the trickiest to execute under game pressure. It’s a good idea for F1 to make an early pass to F2, as a lateral play forces the lone defender and the goaltender to adjust their angles ahead of the critical moment. About two-thirds of 2v1s do not result in a goal. Acting decisively and promptly will ensure the best possible outcome.
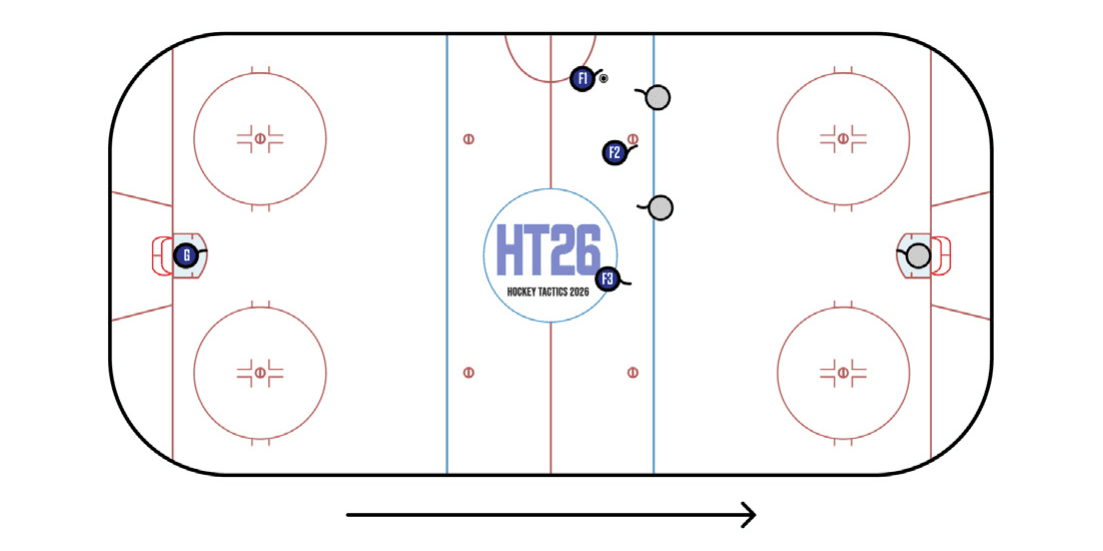
There are two likely scenarios on a 3v2 rush, both calling for F1 to stay wide and bait the strong-side defenseman outside the dot lane. 1) Strong-Side 2v1: As F1 drifts toward the boards, F2 stays in close support to create a 2v1 while F3 sprints to the back post as a tap-in option 2) Middle Drive: F2 accelerates and drives the net between both defensemen while F3 cuts into the high slot for a catch-and-shoot opportunity
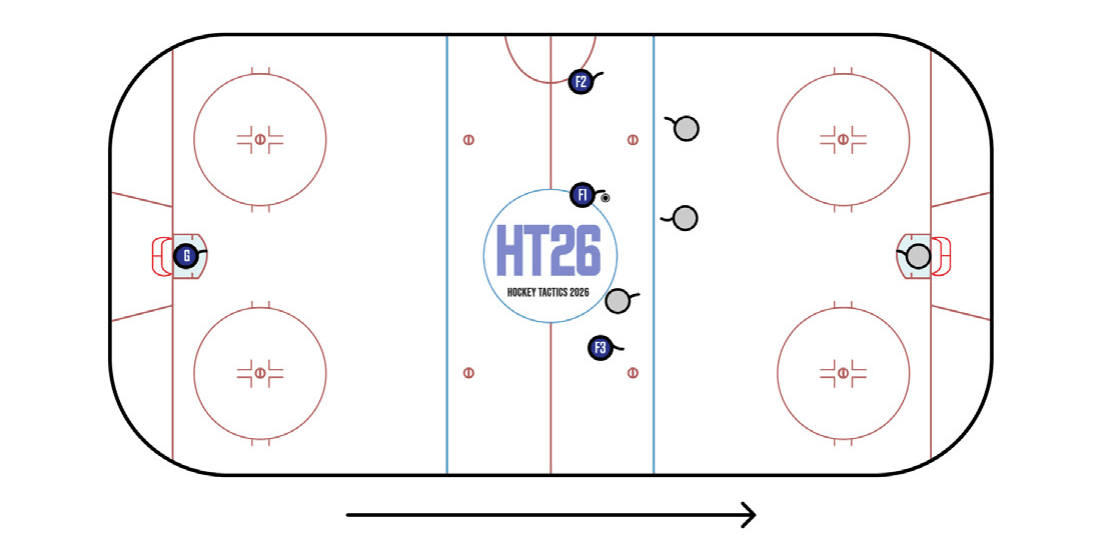
All else being equal, carrying the puck through the middle drastically improves the attacking team’s ability to threaten the net immediately after crossing the blue line. By entering the OZ between the dots, F1 forces both Ds to collapse to the middle and invites the first backchecking forward to overcommit. Meanwhile, F2 is an easy target for a kick-out pass while F3 has an opportunity to win a foot race to the back post.
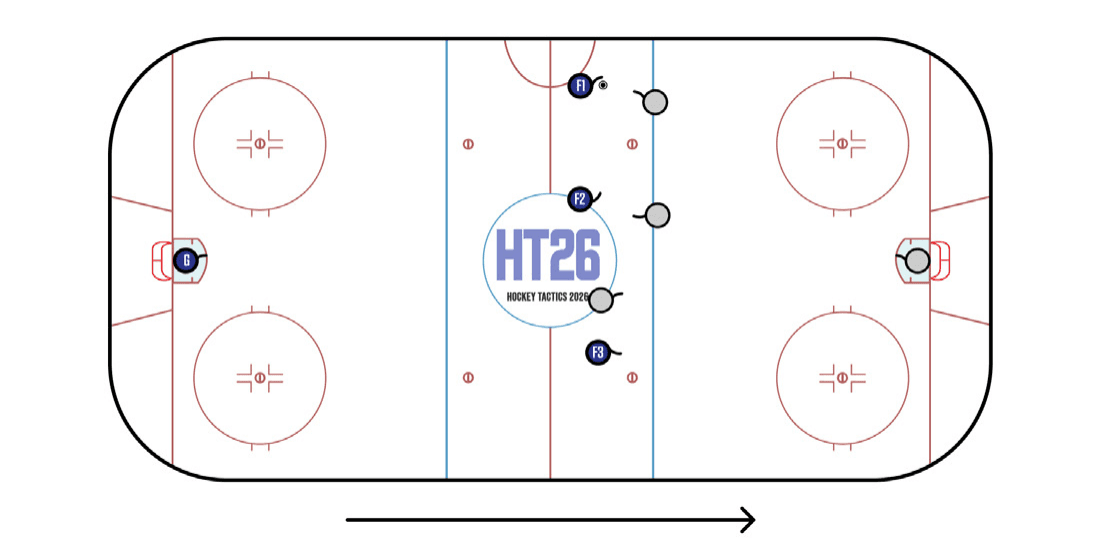
It is difficult to create a rush chance without a numerical advantage. The odds are especially against a puck carrier attempting to enter the offensive zone from outside the dot lanes, the two invisible lines running end-to-end that separate the perimeter and the middle of the rink. If defenders maintain man-on-man coverage, the attackers will likely have to dump the puck in, else risk a costly turnover.
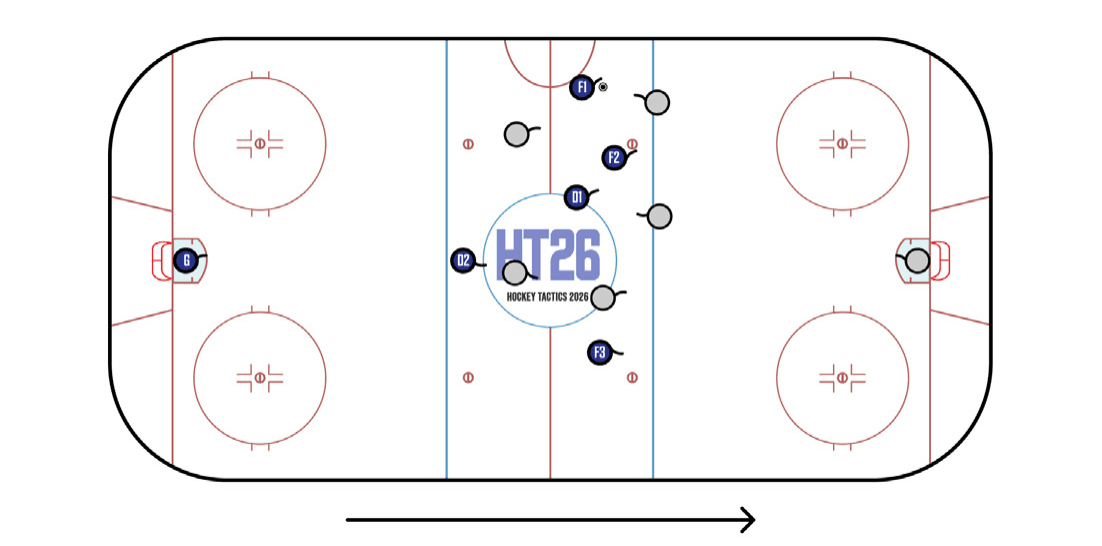
As NHL defensemen become more mobile and offense-minded, teams are giving them permission to join the rush and turn a typical 3v3 line rush into a 4v3. D1’s presence in the middle allows F1 and F2 to overwhelm the strong-side defenseman and create a mismatch on entry. Note that D2, the last man back, may have to defend a 2v1 against if the attacking team turns the puck over at the blue line.